Tutorial on creating a 3D game with LibGDX - Intro
by Monstrous Software
Introduction
In this tutorial series we are going to build a basic first-person shooter using LibGDX.
This will be a 3d single player game. We will be targeting the desktop version and a web version using the gdx-teavm extension. We’ll load 3d assets using the GLTF file format, and we’ll see how we can export assets from modeling software such as Blender. We will add physics using the gdx-ode4j extension.
This will not be a polished game, you can try it out on itch.io now if you want. The idea is to show how you can develop a 3d game using LibGDX and some of the popular extensions.
The development is shown as a number of steps, where every step we add something new (and sometimes we remove something old). There is a github repository which provides all the code corresponding to this tutorial and every step of this tutorial is provided as a git tag. Using the tags you can step through the history of the code. Each step results in a runnable version of the app.
Index
- step 1: project setup, gdx-liftoff, 3d scene
- step 2: FPS camera controller
- step 3: gdx-gltf, importing from Blender
- step 4: multiple objects, grid view
- step 5: physics, collisions, rigid bodies
- step 6: spawning bullets, debug view, player/camera controller
- step 7: mesh collision shapes, collision proxy objects
- step 8: ray casting, ground collision
- step 9: game object types, pickups
- step 10: enemy characters, bullets, health
- step 11: asset manager, sounds
- step 12: GUI
- step 13: gun
- step 14: scope view
- step 15: unified reference frame
- step 16: game controller support
- step 17: head bobbing
- step 18: full screen mode
- step 19: navigation mesh
- step 20: framerate independence
- step 21: navigation mesh generation
Prerequisites
You’ll need an IDE (integrated development environment). I would recommend IntelliJ IDEA. The community version is free and is more than sufficient for this project.
To view or edit the 3d models, you can use Blender which is free to download from Blender.org.
Step 1 - Lift off
To build the initial framework of our project we’ll use the tool gdx-liftoff. This is a replacement for the classic gdx-setup tool.
Download the latest version of gdx-liftoff from here: https://github.com/libgdx/gdx-liftoff.
It comes in the form of a jar file with a name like gdx-liftoff-<version>.jar.
Double-click on the jar file. If nothing happens, go to the command line and type: java -jar gdx-liftoff-1.14.2.0.jar (substitute the version you downloaded).
A window pops up, asking for details of the project you want to build. There are a number of tabbed windows. We’ll go through them one by one and then gdx-liftoff will generate the project outline for us.
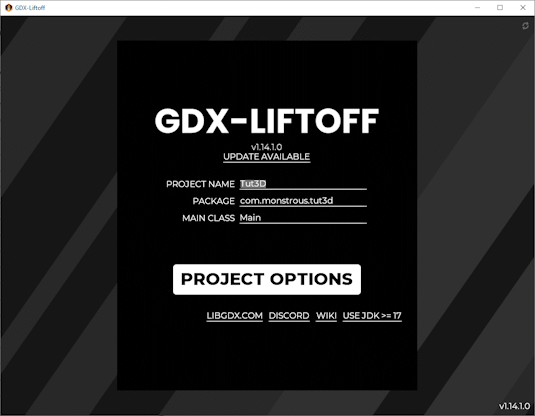
In the main screen we fill in:
- the name of the project: ‘Tut3D’
- a package identifier, for example ‘com.yourcompany.yourgame’
- the name of the main class. I tend to just call it ‘Main’ for ease of reference.
On the next screen, for the platforms, we select ‘Desktop’. If you’d like to try building a web version, select ‘HTML (TeaVM)’.
The option ‘Core’ always needs to be selected.
Web versions are great for game jams or to reach a large audience, because people can play your game without having to download files. The web versions have some limitations though, so for this tutorial we’ll mainly focus on the desktop version.
Under the tab ‘Extensions’, select ‘Controllers’ for controller support.
Under ‘Templates’ select ‘Game’. This will make it easy to switch between different screens in our game, for example a menu screen and a game screen.
Go to the ‘Third party’ tab and select ‘ControllerMapping’ and ‘ControllerScene2D’ for more controller support. Scroll down and select ‘gdx-gltf’ which we’ll use to import 3d models and for Physics Based Rendering.
On the last tab, select the latest LibGDX version. Select ‘Add GUI assets’ in case we’ll need some GUI elements and ‘Add README’.
Fill in the directory for the project. You can either create an empty folder first and then navigate to it using the ‘Browse’ icon, or type in a name for the folder and press the ‘Create Folder’ button.
Press the button ‘Generate’. The tool will now create a project directory which should look as follows:
![]()
Double-click on build.gradle. Or alternatively, open IntelliJ IDEA and use File/Open to open build.gradle. If IntelliJ asks to open build.gradle as file or as project, answer ‘as project’.
Once IntelliJ has opened the project it will automatically start running some Gradle tasks and download the necessary libraries. This will take a little while.
Open the Gradle menu on the right hand side. Navigate to TutorialFPS/lwjgl3/tasks/application and double-click on the run icon. (Note: the module lwjgl3 is commonly known as the desktop version). This will open a window called ‘TutorialFPS’ with a slightly disappointing black screen for content.
At this point the project structure is created, and we need to start filling in some content.
Our first 3D scene
Rename the class FirstScreen.java to GameScreen.java. This screen will be the most important one in the game because it is where the game is played. Later we can add screens like a main menu, a splash screen, an options screen, etcetera.
To quickly rename a class in the Intellij IDE, right click FirstScreen.java in the Project view. Select Refactor and then rename. This will rename the source file, the name of the class file and also the reference to the class in Main.java.
In the GameScreen class, let’s add some fields: a camera, a camera controller, an environment, a model, a texture, an array of ModelInstance and a ModelBatch.
    private PerspectiveCamera cam;
    private CameraInputController camController;
    private Environment environment;
    private Model modelGround;
    private Texture textureGround;
    private Array<ModelInstance> instances;
    private ModelBatch modelBatch;
In the show method we’ll start with defining a perspective camera. It is this camera that gives us a 3d view of the world.
The first parameter is the viewing angle, you can choose a different value if you want more of a fish eye view.
Experiment with what feels good for your game. We set the position of the camera at x=10, y=1.5 and z=5.
The y dimension is the up dimension and 1.5 means our eyes are 1.5 meters above ground level if we choose our units to correspond to meters.
The camera is set to look at the world origin, i.e. point (0,0,0).
Then we set the near and far clipping plane. This determines the depth range of the viewing frustum.
Anything closer to the camera than the near plane or further that the far plane will not be shown.
Set the far value large enough to see all your scene. Setting it too large however is detrimental for the depth resolution and can lead to Z-fighting artifacts.
After changing camera parameters it is important to call update() so that they take effect.
        cam = new PerspectiveCamera(67, Gdx.graphics.getWidth(),  Gdx.graphics.getHeight());
        cam.position.set(10f, 1.5f, 5f);
        cam.lookAt(0,0,0);
        cam.near = 1f;
        cam.far = 300f;
        cam.update();
Next we will set up a camera controller that will allow us to move the camera around.
We’ll use a standard one from LibGDX, the CameraInputController which lets you orbit
the camera around a central point using the mouse. We’ll replace this later with other
camera controllers. The camera controller is an input processor, so we tell GDX to
send input events (e.g. mouse movements) to this camera controller.
       camController = new CameraInputController(cam);
       Gdx.input.setInputProcessor(camController);
The environment is defined to add some lighting: some ambient light and a directional light.
        environment = new Environment();
        environment.set(new ColorAttribute(ColorAttribute.AmbientLight, 0.6f, 0.6f, 0.6f, 1f));
        environment.add(new DirectionalLight().set(0.8f, 0.8f, 0.8f, -1f, -0.8f, -0.2f));
We’ll define a box to act as ground level. Let’s load an image to be used as a texture. We use a TextureRegion to scale it to repeat ten times across the model.
        textureGround = new Texture(Gdx.files.internal("textures/Stylized_Stone_Floor_005_basecolor.jpg"), true);
        textureGround.setFilter(Texture.TextureFilter.MipMapLinearLinear, Texture.TextureFilter.Linear);
        textureGround.setWrap(Texture.TextureWrap.Repeat, Texture.TextureWrap.Repeat);
        TextureRegion textureRegion = new TextureRegion(textureGround);
        int repeats = 10;
        textureRegion.setRegion(0,0,textureGround.getWidth()*repeats, textureGround.getHeight()*repeats );
Now we’ll use ModelBuilder to create a model for the ground. The model is just a simple box measuring 100 by 100 in width and depth and 1 in height. We apply the texture that we just loaded as the diffuse texture. Then we indicate that for each vertex of the model, we’ll need a position, a normal vector which is important for lighting and the texture coordinates because we are applying a texture on the model.
        ModelBuilder modelBuilder = new ModelBuilder();

        // create model
        modelGround = modelBuilder.createBox(100f, 1f, 100f,
            new Material(TextureAttribute.createDiffuse(textureRegion)),
            VertexAttributes.Usage.Position | VertexAttributes.Usage.Normal | VertexAttributes.Usage.TextureCoordinates);
Now that we have a model we can create a ModelInstance from it. This is an instantiation of the model in a particular position. In this case we will only make one model instance and place it at (0,-1,0) so that the top of the box is exactly at Y=0 which we’ll use as a convenient ground level.
Although, we only have one instance in this case it is handy to use an array of ModelInstance in case we want to add more instances later.
        // create and position model instances

        instances = new Array<>();
        instances.add(new ModelInstance(modelGround, 0, -1, 0));	// 'table top' surface
To render model instances we will use a ModelBatch.
modelBatch = new ModelBatch();
This concludes the setup we need to do in the show() method.
Now let’s get to the rendering itself. First let’s declare a constant for the background colour, a light shade of blue.
public final Color BACKGROUND_COLOUR = new Color(153f/255f, 255f/255f, 236f/255f, 1.0f);
The render() method of the GameScreen will be called for each frame, typically 60 times per second. We use it to render the screen contents, but we also use it to update whatever is happening in the game. For example, here we call the update method of the camera controller to let the camera respond to mouse movements and key presses.
To then render, we clear the screen to the background colour and clear the depth buffer using ScreenUtils.clear(). And then we use the model batch to render the array of instances.
        @Override
        public void render(float delta) {
                // update
                camController.update();

                // render
                ScreenUtils.clear(BACKGROUND_COLOUR, 1.0f, true);
                modelBatch.begin(cam);
                modelBatch.render(instances, environment);
                modelBatch.end();
        }
The resize() method is used to update the camera viewport in case the window size changes.
        @Override
        public void resize(int width, int height) {
                cam.viewportWidth = width;
                cam.viewportHeight = height;
                cam.update();
        }
On leaving the game screen, either because you close the application or you are switching to another screen, the hide() method is called.
This is the opportunity to tidy up and dispose some objects we’ve created to avoid memory leaks.
If you’re not sure what needs to be disposed, check if the object class has a dispose() method.
For example, you need to dispose each Model, but not a ModelInstance.
You need to dispose ModelBatch, but not the PerspectiveCamera.
        @Override
        public void hide() {
            dispose();
        }

        @Override
        public void dispose() {
            modelBatch.dispose();
            modelGround.dispose();
            textureGround.dispose();
        }
We can delete the functions pause() and resume() that were auto generated if we also change GameScreen from implements Screen to extends ScreenAdapter.
Create or download a ground texture, e.g. this one created by Katsukagi which is available at 3dtextures.me and place it in the folder assets/textures
Replace the texture filename in the code as needed.
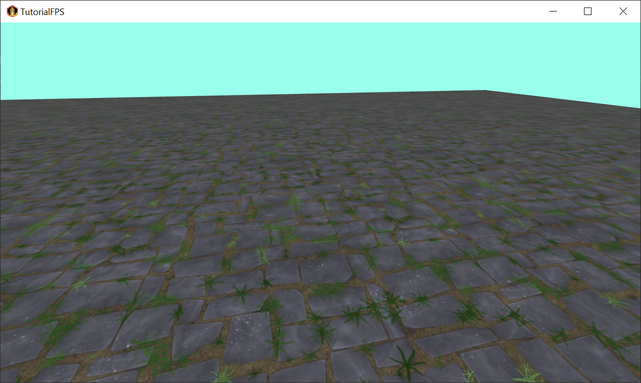
After all this code, we should now have a very basic 3d scene: we appear to be standing on a texture box that is floating in space. You can use the mouse to change the view (hold down left or right mouse button) and the WASD keys to move around, albeit in a rather clumsy manner. You can use the mouse wheel to zoom.
Desktop launcher
Add the following lines to the desktop launcher (Lwjgl3Launcher) to increase the size of the window and to activate anti-aliasing to reduce the jagged lines where the ground box meets the sky. Increase the size of the window to a size you’re comfortable with, it depends a bit on what monitor you are using.
        configuration.setWindowedMode(1280, 720);
        configuration.setBackBufferConfig(8, 8, 8, 8, 16, 0, 4);
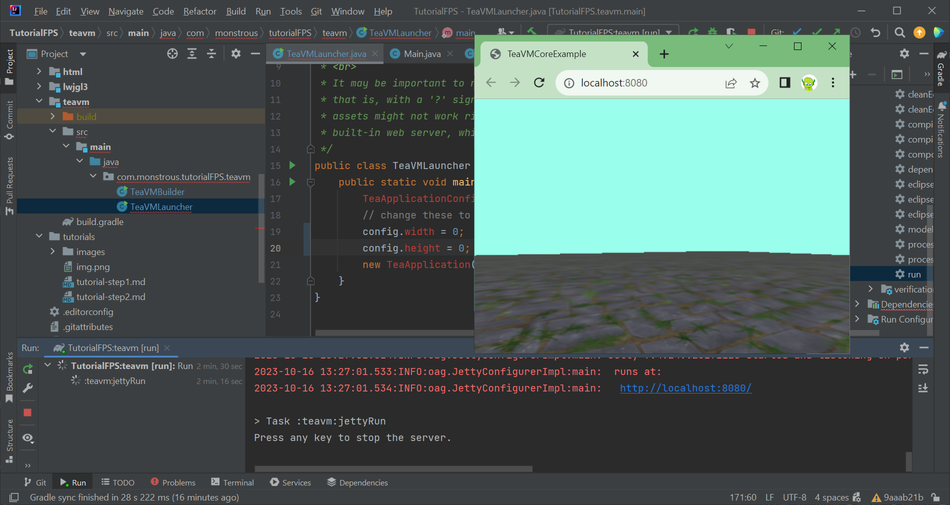
TeaVM launcher
To test the web version of this demo, go to the Gradle window in Intellij, select teavm/Tasks/other/run. This will compile the code and start up a local web server. If the code compiles sucesfully, you will see a link to the web server among the compiler messages in the Run window: http://localhost:8080. Click on that link in the Run window to see the demo in a web browser.
Probably you want the demo to fill the browser screen, so change the config width and height to zero in TeaVMLauncher to use all available space. We also activate anti-aliasing:
        config.width = 0;
        config.height = 0;
        config.antialiasing = true;
Conclusions
This concludes step 1. We’ve set up a project with gdx-liftoff. We’ve learnt about the perspective camera that is used to show a 3d view.
About models that represent the shape and texture of a 3d model and model instances that place a model
somewhere in the game world. We’ve learnt that the model batch is used to render model instances.
And we’ve seen our first camera controller. In the next step, we’re going to improve on that camera controller.