3D Tutorial - Step 13 - Gun
by Monstrous Software
Step 13 - Gun
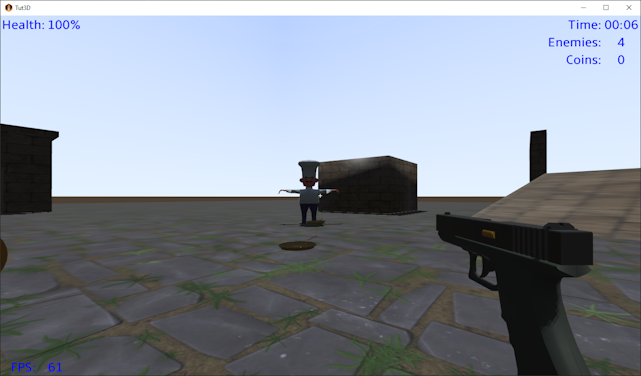
Up to now our protagonist has been fighting with what look like red plastic balls. It is time to upgrade to a Glock-19.
Gun pick-up
Add the following type constant to GameObjectType:
public final static GameObjectType TYPE_PICKUP_GUN = new GameObjectType("gun", false, false, true, false , false, false);
Add the following line to Populator.populator
world.spawnObject(GameObjectType.TYPE_PICKUP_GUN, "GunArmature", null, CollisionShapeType.SPHERE, true, new Vector3(0,0.3f, 0), 5);
and change the spawn position for the player to (5,1,5):
        GameObject go = world.spawnObject(GameObjectType.TYPE_PLAYER, "ducky",null, CollisionShapeType.CAPSULE, true, new Vector3(5,1,5), Settings.playerMass);
        world.setPlayer(go);
We should now be able to see the gun close to the player at startup and pick it up, just like a coin or a health pack. Of course, nothing happens yet when we pick it up.
Gun View
The next step is to show the gun from first person view. Because Ducky, our player character, has no hands we will not render any arms or hands, but just a gun floating in front of the camera. We will render the first person weapon as a 3d overlay over the view of the game world. In fact, we will actually use a separate GameView instance and a separate World instance which will only contain the gun.
First a few changes are needed to the GameView class. We add more parameters to the constructor to define if the view is an overlay view, to define the near and far distances for the camera clipping planes and a scale factor for the head bobbing effect. The skybox is created only if the view is not an overlay.
            // if the view is an overlay, we don't clear screen on render, only depth buffer
            //
            public GameView(World world, boolean overlay, float near, float far, float bobScale) {
                this.world = world;
                this.isOverlay = overlay;
                this.bobScale = bobScale;

                sceneManager = new SceneManager();

                cam = new PerspectiveCamera(67, Gdx.graphics.getWidth(),  Gdx.graphics.getHeight());
                cam.position.set(0f, Settings.eyeHeight, 0f);
                cam.lookAt(0,Settings.eyeHeight,10f);
                cam.near = near;
                cam.far = far;
                cam.update();

                ...

                // setup skybox
                if(!isOverlay) {
                    skybox = new SceneSkybox(environmentCubemap);
                    sceneManager.setSkyBox(skybox);
                }
            }
GameView’s render() method is also modified. We remove the code which toggles between first and third person with the F2 key, we will move this to GameScreen, because if affects not only the
game view but also if we need to show the gun or not.
Then the camController.update() call is skipped in case the view is an overlay. Also, we don’t clear the screen anymore, we only clear the depth buffer. Remember that in the game view the sky box will fill in the
background anyway.
        public void render(float delta ) {
            if(!isOverlay)
                camController.update(world.getPlayer().getPosition(), world.getPlayerController().getViewingDirection());
            cam.update();
            if(world.isDirty())
                refresh();
            sceneManager.update(delta);

            Gdx.gl.glClear(GL20.GL_DEPTH_BUFFER_BIT);   // clear depth buffer only
            sceneManager.render();
        }
In the GameScreen class we make the following changes:
Add the following fields:
        private GameView gunView;
        private World gunWorld;
        private GameObject gun;
        private boolean thirdPersonView = false;
We now create the gameView object as follows:
        gameView = new GameView(world,false, 0.1f, 300f, 1f);
        gameView.getCameraController().setThirdPersonMode(thirdPersonView);
        world.getPlayer().visible = thirdPersonView;            // hide player mesh in first person
And we add the following lines at the end of show() to create the gun world and the gun view:
        // load gun model
        gunWorld = new World();
        gunWorld.clear();
        gun = gunWorld.spawnObject(GameObjectType.TYPE_STATIC, "GunArmature", null, CollisionShapeType.BOX, true, new Vector3(0,0,0), 1f);
        gun.scene.animationController.allowSameAnimation = true;
        gun.scene.modelInstance.transform.setToScaling(Settings.gunScale, Settings.gunScale, Settings.gunScale);
        gun.scene.modelInstance.transform.setTranslation(Settings.gunPosition);

        // create an overlay view and add gun model
        gunView = new GameView(gunWorld, true, 0.01f, 10f, 0.1f);
In the Settings class the following new lines are added:
        static public Vector3 gunPosition = new Vector3(-1.1f, 1.9f, 1.8f); // gun position in gun camera view
        static public float gunScale = 3.0f;
The following code is added to GameScreen.render() to replace the code we removed from GameView to toggle between first person and third person:
        if (Gdx.input.isKeyJustPressed(Input.Keys.F2) ) {
            thirdPersonView = !gameView.getCameraController().getThirdPersonMode();
            gameView.getCameraController().setThirdPersonMode(thirdPersonView);
            world.getPlayer().visible = thirdPersonView;            // hide player mesh in first person
            gameView.refresh();
        }
And we add the following lines to render() after rendering the gameView but before rendering the GUI:
        if(!thirdPersonView) {
            gunView.render(delta);
        }
Weapon state
At this point the gun model is always shown in screen when in first person. But we want to switch between weapons and only show the gun after we’ve picked it up.
Let us add a few classes to encode what weapons we could have and what their state is. First a class WeaponType defines we have two types of weapons: a ball or a gun. We define this as an enum. For each type we add it repeat rate, i.e. how frequently we can fire it (or actually how much delay we will have between shots).
        // types of weapon and their handling characteristics
        public enum WeaponType {

            BALL (0.2f),
            GUN (0.5f);

            public final float repeatRate;            // seconds

            WeaponType(float repeatRate ){
                this.repeatRate = repeatRate;
            }
        }
Having defined the types of weapon that the payer could use, we now define a class to define which weapons the player has (or rather simply: does the player have a gun?) and which weapon the player is currently holding. We also use this class to keep a timer to delay between shots.
        //  which weapon is active and status of weapon
        public class WeaponState {
            public boolean haveGun;
            public WeaponType currentWeaponType;
            public float fireTimer;   // timer between shots, <= 0 means ready to fire
            public boolean firing;

            public WeaponState() {
                reset();
            }

            public void reset(){
                haveGun = false;
                currentWeaponType = WeaponType.BALL;
                fireTimer = 0;
            }

            public void switchWeapon() {
                if(currentWeaponType == WeaponType.BALL && haveGun)
                    currentWeaponType = WeaponType.GUN;
                else
                    currentWeaponType = WeaponType.BALL;
            }

            public void update(float deltaTime) {
                fireTimer -= deltaTime;
            }

            public boolean isWeaponReady() {
                if(fireTimer > 0)           // prevent spamming the trigger
                    return false;
                fireTimer = currentWeaponType.repeatRate;    // in seconds: fire rate limiter
                return true;
            }
        }
Then we add a WeaponState object as a public field of the World class:
public final WeaponState weaponState;
And we make sure to call the weapon state update method in World.update():
weaponState.update(deltaTime);
And we reset the weapon state in World.clear() to the initial state:
weaponState.reset();
Now we can modify the pickup() method in the World class to play a sound effect and to change the weapon we’re holding.
    private void pickup(GameObject character, GameObject pickup){

        removeObject(pickup);
        if(pickup.type == GameObjectType.TYPE_PICKUP_COIN) {
            stats.coinsCollected++;
            Main.assets.sounds.COIN.play();
        }
        else if(pickup.type == GameObjectType.TYPE_PICKUP_HEALTH) {
            character.health = Math.min(character.health + 0.5f, 1f);   // +50% health
            Main.assets.sounds.UPGRADE.play();
        }
        else if(pickup.type == GameObjectType.TYPE_PICKUP_GUN) {
            weaponState.haveGun = true;
            weaponState.currentWeaponType = WeaponType.GUN;
            Main.assets.sounds.UPGRADE.play();
        }
    }
Next step is to play the gun’s fire animation when shooting. First we will replace the World.shootBall() method by something more generic and use the WeaponState object to
indicate if the gun is firing. We will then trigger the animation from GameScreen.update()
Replace shootBall() with the following code:
        public void fireWeapon(Vector3 viewingDirection) {
            if(player.isDead())
                return;
            if(!weaponState.isWeaponReady())  // to give delay between shots
                return;
            weaponState.firing = true;    // set state to firing (triggers gun animation in GameScreen)

            switch(weaponState.currentWeaponType) {
                case BALL:
                    spawnPos.set(viewingDirection);
                    spawnPos.add(player.getPosition()); // spawn from 1 unit in front of the player
                    GameObject ball = spawnObject(GameObjectType.TYPE_FRIENDLY_BULLET, "ball", null, CollisionShapeType.SPHERE, true, spawnPos, Settings.ballMass );
                    shootDirection.set(viewingDirection);        // shoot in viewing direction (can be up or down from player direction)
                    shootDirection.scl(Settings.ballForce);   // scale for speed
                    ball.body.geom.getBody().setDamping(0.0f, 0.0f);
                    ball.body.applyForce(shootDirection);
                    break;
                case GUN:
                    Main.assets.sounds.GUN_SHOT.play();
                    break;
            }
        }
Add the following method to PlayerController to shoot with the left mouse button:
        @Override
        public boolean touchDown(int screenX, int screenY, int pointer, int button) {
            if(button == Input.Buttons.LEFT) {
                world.fireWeapon(  viewingDirection );
            }
            return false;
        }
Also adapt the keyUp() method of PlayerController to switch weapons with the TAB key.
        public int switchWeaponKey = Input.Keys.TAB;

        @Override
        public boolean keyUp (int keycode) {
            keys.remove(keycode, 0);

            if (keycode == switchWeaponKey)             // switch weapons on key release
                world.weaponState.switchWeapon();

            return true;
        }
To add the animation, add the following code to GameScreen.render():
        if(world.weaponState.firing){
            world.weaponState.firing = false;
            if(world.weaponState.currentWeaponType == WeaponType.GUN && !thirdPersonView)
                gun.scene.animationController.setAnimation("Fire", 1);   // run the fire weapon animation once
        }
You should now hear a sound effect and see the animation when you fire the gun.
Of course, you can’t hit anything yet. For this we will use ray casting again. We already had a ray defined to test contact with a ground surface, we now add a ray (“shootRay”) to test if the gun will hit anything.
We create a new class HitPoint to hold the details of a contact between the shootRay and an object that is shot. This can be used to apply an impact on the shot object and for example to do special effects.
    public class PhysicsRayCaster implements Disposable {

        private final PhysicsWorld physicsWorld;       // reference only
        private final DRay groundRay;
        private final DRay shootRay;
        private GameObject player;

        public PhysicsRayCaster(PhysicsWorld physicsWorld) {
            this.physicsWorld = physicsWorld;
            groundRay = OdeHelper.createRay(1);        // length gets overwritten when ray is used
            shootRay = OdeHelper.createRay(1);        // length gets overwritten when ray is used
        }
        ...

        // class to contain details of hit point
        public static class HitPoint {
            public boolean hit;
            public float distance;
            public GameObject refObject;
            public Vector3 normal;
            public Vector3 worldContactPoint;

            public HitPoint() {
                normal = new Vector3();
                worldContactPoint = new Vector3();
            }
        }

        // use ray casting to see if cross-hair is over a target game object
        //
        public boolean findTarget(Vector3 playerPos, Vector3 viewDir, HitPoint hitPoint) {
            shootRay.setLength(100);    // shooting distance
            shootRay.set(playerPos.x, -playerPos.z, playerPos.y, viewDir.x, -viewDir.z, viewDir.y); // point ray in viewing direction, starting at player's centre

            // the following settings are only relevant to triMesh collisions which can be expensive
            // they do NOT mean only the first or closest geom is returned,

            shootRay.setFirstContact(true);     // use first contact when colliding with a triMesh
            shootRay.setBackfaceCull(true);     // ignore back faces when colliding with a triMesh
            shootRay.setClosestHit(false);      // when colliding with triMesh, dont search for closest hit, just use the first one

            hitPoint.hit = false;   // reset hit point
            hitPoint.distance = Float.MAX_VALUE;
            OdeHelper.spaceCollide2(physicsWorld.space, shootRay, hitPoint, shootCallback);
            return hitPoint.hit;
        }

        private final DGeom.DNearCallback shootCallback = new DGeom.DNearCallback() {

            @Override
            public void call(Object data, DGeom o1, DGeom o2) {
                HitPoint hitPoint = (HitPoint)data;

                final int N = 1;    // the ray will make only one contact with this geom
                DContactBuffer contacts = new DContactBuffer(N);
                if( OdeHelper.collide (o1,o2,N,contacts.getGeomBuffer()) > 0 ) {    // collision?
                    // which DGeom is not the ray?
                    GameObject go;
                    if (o2 instanceof DRay)
                        go = (GameObject) o1.getData();
                    else
                        go = (GameObject) o2.getData();
                    if(go.type.isPlayer)       // ignore ray hitting player himself
                        return;
                    double d = contacts.get(0).getContactGeom().depth;
                    // keep the closest contact
                    if(d < hitPoint.distance) {
                        hitPoint.hit = true;
                        hitPoint.distance = (float)d;
                        hitPoint.refObject = go;
                        DVector3 normal = contacts.get(0).getContactGeom().normal;
                        hitPoint.normal.set((float) normal.get(0),-(float) normal.get(2), (float) normal.get(1));
                        DVector3 pos = contacts.get(0).getContactGeom().pos;
                        hitPoint.worldContactPoint.set((float) pos.get(0), -(float) pos.get(2), (float) pos.get(1));
                    }
                }
            }
        };
Now update PlayerController and adapt the touchDown() method we just added to make use of the ray caster to find a hit point.
This hit point is passed as an additional parameter to world.fireWeapon() to provide the point of impact of a gun shot.
        private final PhysicsRayCaster.HitPoint hitPoint = new PhysicsRayCaster.HitPoint();

        public PlayerController(World world)  {
            this.world = world;
            linearForce = new Vector3();
            forwardDirection = new Vector3();
            viewingDirection = new Vector3();
            reset();
        }

        @Override
        public boolean touchDown(int screenX, int screenY, int pointer, int button) {
            if(button == Input.Buttons.LEFT) {
                world.rayCaster.findTarget(world.getPlayer().getPosition(), viewingDirection, hitPoint);
                world.fireWeapon(  viewingDirection, hitPoint  );
            }
            return false;
        }
The fireWeapon() method in the World class now needs updating to use this extra hit point parameter. We can calculate an impulse and apply it to the object that was shot. This will make small
objects shoot away and larger objects will be pushed back:
        private final Vector3 impulse = new Vector3();

        public void fireWeapon(Vector3 viewingDirection,  PhysicsRayCaster.HitPoint hitPoint) {
                if(player.isDead())
                    return;
                if(!weaponState.isWeaponReady())  // to give delay between shots
                    return;
                weaponState.firing = true;    // set state to firing (triggers gun animation in GameScreen)

                switch(weaponState.currentWeaponType) {
                    case BALL:
                        //...
                    case GUN:
                        Main.assets.sounds.GUN_SHOT.play();
                        if(hitPoint.hit) {
                            GameObject victim = hitPoint.refObject;
                            Gdx.app.log("gunshot hit", victim.scene.modelInstance.nodes.first().id);
                            if(victim.type.isEnemy)
                                bulletHit(victim);

                            impulse.set(victim.getPosition()).sub(player.getPosition()).nor().scl(Settings.gunForce);
                            if(victim.body.geom.getBody() != null ) {
                                victim.body.geom.getBody().enable();
                                victim.body.applyForceAtPos(impulse, hitPoint.worldContactPoint);
                            }
                        }
                        break;
                }
            }
We need an additional method in PhysicsBody to apply a force with an offset instead of applying the force at centre mass. This means the impact depends on where the object was hit.
The method is very similar to applyForce().
        public void applyForce( Vector3 force ){
            DBody rigidBody = geom.getBody();
            rigidBody.addForce(force.x, -force.z, force.y);  // swap z & y
        }

        public void applyForceAtPos( Vector3 force, Vector3 pos ){
            DBody rigidBody = geom.getBody();
            rigidBody.addForceAtPos(force.x, -force.z, force.y, pos.x, -pos.z, pos.y);  // swap z & y
        }
This concludes step 13. We can now pick up the gun and shoot at the cooks or at other objects, such as the coins or the balls.