3D Tutorial - Step 12 - GUI
by Monstrous Software
Step 12 - GUI
User Interface
In this step we will add a basic User Interface overlay to show the player’s health, the number of enemies remaining and the number of coins collected.
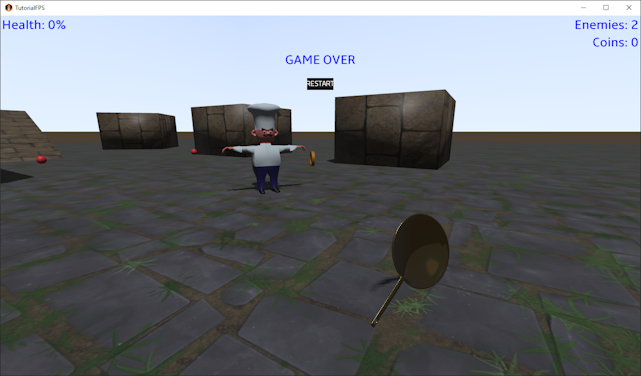
The following image shows the UI overlay in action:
For this overlay, we will create class called GUI, which we will create and use in the GameScreen class. We will call the GUI constructor in the show() method and pass it a reference to the World class. The GUI needs access to the World class to extract the player health, the enemies left and the coins collected.
Then, in GameScreen’s show() method, the stage member of GUI is added to the chain of input processors that are attached to the input multiplexer. Normally the GUI should be the first in the chain so that it is first in line to process mouse clicks etc.
        public class GameScreen extends ScreenAdapter {
            ...
            private GUI gui;                             // <----- new

            @Override
            public void show() {
                // create scene
                sceneManager = new SceneManager();
                world = new World(sceneManager);
                gui = new GUI(world);                       // <----- new

                ...
                InputMultiplexer im = new InputMultiplexer();
                Gdx.input.setInputProcessor(im);
                im.addProcessor(gui.stage);                 // <----- new
                im.addProcessor(playerController);
                im.addProcessor(camController);
                ...

            }
Then at the end of the GameScreen render() method the GUI render method is called. By calling it at the end, the GUI is shown on top of everything else.
            @Override
            public void render(float delta) {
                ...
                gui.render(delta);
             }
The GameScreen resize() method needs to be propagated to the GUI so that it also scaled with any window resize.
            @Override
            public void resize(int width, int height) {
                sceneManager.updateViewport(width, height);
                gui.resize(width, height);                      // <----- new
            }
And lastly the GUI needs to be disposed when the GameScreen is closed to release any resources.
            @Override
            public void dispose() {
                ...
                gui.dispose();
            }
        }
Now to write the GUI class itself. First we’ll make a rough outline, then we’ll fill in the details.
As we already saw, the GUI encapsulates a Stage instance from the Scene2D library. This is made public, to that it can be added to the input multiplexer
in GameScreen show() (see above). Then it has a field to represent the skin, which we load from a JSON file.
This skin file was added by gdx-liftoff when we created the project in step 1 and selected ‘Add GUI assets’. You can also make your own skin file
with Skin Composer and there are
also some free skin themes you can download
We create a method called rebuild() to add the different UI elements to the stage. This will be called from the resize() method and will be called each time the window is resized.
If we don’t rebuild the stage on a resize, it is going to look very ugly. Note that we don’t have to call rebuild() from the constructor because resize() is guaranteed to be called after GameScreen show().
        public class GUI implements Disposable {

            public Stage stage;
            private Skin skin;
            private World world;
            private GameScreen screen;

            public GUI(World world, GameScreen screen) {
                this.world = world;
                this.screen = screen;
                stage = new Stage(new ScreenViewport());
                skin = Main.assets.skin;
            }

            private void rebuild() {
                // to do
            }

            public void render(float deltaTime) {
                stage.act(deltaTime);
                stage.draw();
            }

            public void resize(int width, int height) {
                stage.getViewport().update(width, height, true);
                rebuild();
            }

            @Override
            public void dispose() {
                stage.dispose();
                skin.dispose();
            }
        }
So this is the basic structure, it should now compile, but it doesn’t show anything yet. Let us fill in the rebuild() method. We clear the stage. This is important when we get multiple resizes, because we need to clear out the old actors off the stage. Then we create a label style with a nice big font and in a high contrast colour. Usually, you will use a label style defined in the Skin JSON, but in this case none of the label styles were very suitable. Rather than adding a new style to the skin, e.g. with Skin Composer, we will create a style on the fly for the sake of brevity.
To lay out the different screen elements it is often useful to create a Table that fills the screen. This we do with setFillParent(true). You can use a table to dynamically adapt element positions to the screen size, without having to define x,y positions. Instead, we define here we want 4 rows of 4 columns, aligned to the top of the screen. Two columns to the right and two columns to the left with a gap in between (this is what expandX() is for). The “GAME OVER” label and the Restart button are set to hidden. They will be made visible when the game is over.
        private void rebuild() {

                stage.clear();

                BitmapFont bitmapFont=new BitmapFont(Gdx.files.internal("font/Amble-Regular-26.fnt"));
                Label.LabelStyle labelStyle = new Label.LabelStyle(bitmapFont, Color.BLUE);

                Table screenTable = new Table();
                screenTable.setFillParent(true);

                healthLabel = new Label("100%", labelStyle);
                enemiesLabel = new Label("2", labelStyle);
                coinsLabel = new Label("0", labelStyle);
                gameOverLabel = new Label("GAME OVER", labelStyle);
                restartButton = new TextButton("RESTART", skin);

                 screenTable.top();
                // 4 columns: 2 at the left, 2 at the right
                // row 1
                screenTable.add(new Label("Health: ", labelStyle)).padLeft(5);
                screenTable.add(healthLabel).left().expandX();

                screenTable.add(new Label("Time: ",  labelStyle));
                screenTable.add(timeLabel).padRight(5);
                screenTable.row();

                // row 2
                screenTable.add(new Label("Enemies: ", labelStyle)).colspan(3).right();
                screenTable.add(enemiesLabel).padRight(5);
                screenTable.row();

                // row 3
                screenTable.add(new Label("Coins: ",  labelStyle)).colspan(3).right();
                screenTable.add(coinsLabel).padRight(5);
                screenTable.row();

                // row 4
                screenTable.add(gameOverLabel).colspan(4).row();
                gameOverLabel.setVisible(false);            // hide until needed

                // row 5
                screenTable.add(restartButton).colspan(4).pad(20);
                restartButton.setVisible(false);            // hide until needed
                screenTable.row();

                // row 6 at bottom of screen
                screenTable.add(new Label("FPS: ", labelStyle)).expandY().bottom().padLeft(5);
                screenTable.add(fpsLabel).left().expandX().bottom();

                screenTable.pack();

                stage.addActor(screenTable);

                restartButton.addListener(new ClickListener() {
                    @Override
                    public void clicked(InputEvent event, float x, float y) {
                        super.clicked(event, x, y);
                        screen.restart();
                        // hide restart button, game-over label and hide mouse cursor
                        restartButton.setVisible(false);
                        gameOverLabel.setVisible(false);
                        Gdx.input.setCursorCatched(true);
                    }
                });
        }
The restart button is defined with a click listener that calls screen.restart() and then hides the button and the Game Over label again.
As the labels need to reflect the actual situation, we create a method called updateLabels() which is called from the render() method.
This obtains values from the World instance and uses gives the labels a corresponding value.
In a real game, you’d want to make this a lot more appealing, maybe using icons, a health bar etc. instead of plain text labels.
We use a StringBuffer to avoid garbage collection from doing string concatenations every frame.
This method also check if the player has died, in which case it unhides the GAME OVER label and the restart button.
It also unhides the mouse so that the user can actually click the button. The mouse cursor is hidden again when the button is clicked.
        private void updateLabels() {
            sb.setLength(0);
            sb.append((int)(world.getPlayer().health*100));
            sb.append("%");
            healthLabel.setText(sb.toString());

            sb.setLength(0);
            sb.append((int)(Gdx.graphics.getFramesPerSecond()));
            fpsLabel.setText(sb.toString());

            sb.setLength(0);
            int mm = (int) (world.stats.gameTime/60);
            int ss = (int)( world.stats.gameTime - 60*mm);
            if(mm <10)
                sb.append("0");
            sb.append(mm);
            sb.append(":");
            if(ss <10)
                sb.append("0");
            sb.append(ss);
            timeLabel.setText(sb.toString());

            sb.setLength(0);
            sb.append(world.stats.numEnemies);
            enemiesLabel.setText(sb.toString());

            sb.setLength(0);
            sb.append(world.stats.coinsCollected);
            coinsLabel.setText(sb.toString());

            if(world.stats.levelComplete){
                gameOverLabel.setText("LEVEL COMPLETED IN "+timeLabel.getText());
                gameOverLabel.setVisible(true);
                restartButton.setVisible(true);
                Gdx.input.setCursorCatched(false);
            }

            if(world.getPlayer().isDead()) {
                gameOverLabel.setText("GAME OVER");
                gameOverLabel.setVisible(true);
                restartButton.setVisible(true);
                Gdx.input.setCursorCatched(false);
            }
        }
Let us add a basic cross-hair to the screen overlay. First define a label as a new field in the GUI class:
        private Label crossHairLabel;

Then we add the following lines to the rebuild() method to create a new full-screen table which we add as actor to the stage.
This table has only a single label widget with a plus sign.  The label will be automatically centred on the screen.

```java
            // put cross-hair centre screen
            Table crossHairTable = new Table();
            crossHairTable.setFillParent(true);
            crossHairLabel = new Label("+", skin);
            crossHairTable.add(crossHairLabel);
            stage.addActor(crossHairTable);

We want to show the cross-hair only when in first person view. Therefore, we add a method to show or hide it.

```java
        public void showCrossHair( boolean show ){
            crossHairLabel.setVisible(show);
        }
In GameScreen we can call this method to enable the cross-hair only when in first person view:
        @Override
        public void render(float delta) {
            ...
            gui.showCrossHair( !gameView.inThirdPersonMode() );
            gui.render(delta);
        }
Where in the GameView class this new method is defined as follows:
        public boolean inThirdPersonMode() {
            return camController.getThirdPersonMode();
        }
This concludes step 12 where we’ve added a user interface overlay to the game screen.