3D Tutorial - Step 14 - Scope Mode
by Monstrous Software
Step 14 - Scope Mode
It would be cool to use our little hand gun as some kind of sniper rifle and look through a scope to land headshots miles away.
For the scope view we will simply overlay an image with some alpha masking over the screen. At the same time we will narrow the camera’s field of view to zoom in.
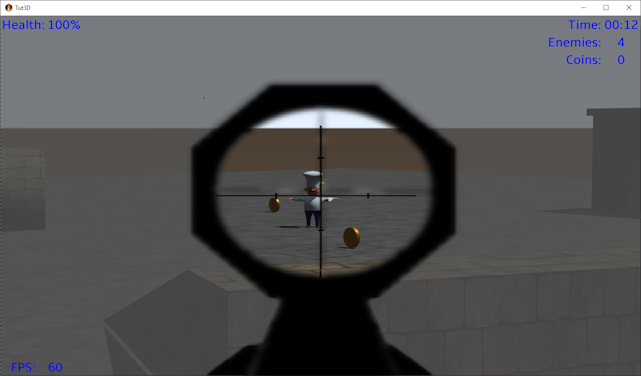
We introduce a new class to render a full screen image overlay from a texture. We can animate a recoil effect by scaling this image very briefly so that there is some visual feedback when the gun is fired.
        public class ScopeOverlay implements Disposable {
            private final SpriteBatch batch;
            private final Texture scopeTexture;
            private float recoilTimer;              // > 0 for recoil effect

            public ScopeOverlay() {
                this.batch = new SpriteBatch();
                scopeTexture = Main.assets.scopeImage;
                recoilTimer = 0;
            }

            public void startRecoilEffect(){
                recoilTimer = 0.5f; // start timer for 0.5 s
            }

            public void render(float delta) {
                float effect = 0;

                recoilTimer -= delta;
                if(recoilTimer > 0)     // do recoil effect
                    effect = recoilTimer * 50f;     // scale image when firing

                batch.begin();
                batch.draw(scopeTexture, -effect, -effect, Gdx.graphics.getWidth()+2* effect, Gdx.graphics.getHeight()+2* effect);
                batch.end();
            }

            public void resize(int width, int height){
                batch.getProjectionMatrix().setToOrtho2D(0,0, width, height);
            }

            @Override
            public void dispose() {
                batch.dispose();
            }
        }
Add a boolean to the class WeaponState, this will indicate if we are looking through the scope or not:
public boolean scopeMode;
In PlayerController set the scope mode if the right button mouse is down. If the mouse is moved with a button held down the touchDragged() method will be called.
Use this to move the view direction, like in mouseMoved(), but more slowly than in normal mode (20% of normal mouse speed).
        @Override
        public boolean touchDown(int screenX, int screenY, int pointer, int button) {
            if(button == Input.Buttons.LEFT) {
                world.rayCaster.findTarget(world.getPlayer().getPosition(), viewingDirection, hitPoint);
                world.fireWeapon(  viewingDirection, hitPoint );
            }
            if(button == Input.Buttons.RIGHT )
                world.weaponState.scopeMode = true;          // enter scope mode with RMB
            return false;
        }

        @Override
        public boolean touchUp(int screenX, int screenY, int pointer, int button) {
            if(button == Input.Buttons.RIGHT)
                world.weaponState.scopeMode = false;         // leave scope mode
            return false;
        }

        @Override
        public boolean touchDragged(int screenX, int screenY, int pointer) {
            // when in scoped mode, move slower
            mouseDeltaX = -Gdx.input.getDeltaX() * Settings.degreesPerPixel*0.2f;
            mouseDeltaY = -Gdx.input.getDeltaY() * Settings.degreesPerPixel*0.2f;
            return false;
        }
In the class GameScreen we will add a ScopeOverlay object, and we add a boolean to keep track if we are in scope mode or not.
        private ScopeOverlay scopeOverlay;
        private boolean lookThroughScope = false;

        @Override
        public void show() {
            ...
            scopeOverlay = new ScopeOverlay();
            ...
        }
We add a private method to check if we can actually look through the scope or not. There are a few conditions for the scope view: the right mouse button is held down, the player is holding a gun, and we are in first person view. If we are indeed in scope mode we set the camera field of view to 20 degrees for a zoomed in look.
        private void setScopeMode( boolean scopeView ){
            // scope view is only activated if player is holding gun
            // and we're in first person view
            //
            boolean sv = scopeView && !thirdPersonView && world.weaponState.currentWeaponType == WeaponType.GUN;
            if(sv == this.lookThroughScope) // no change
                return;
            this.lookThroughScope = sv;
            if(sv)  // entering scope view
                gameView.setFieldOfView(20f);        // very narrow field of view
            else   // leaving scope view, back to normal view
                gameView.setFieldOfView(67f);
        }
The render() method is adapted to call the setScopeMode() method and to render the scope overlay if needed.
We also hide the gun view and the cross-hair if we are in scope mode.
When we fire a bullet we call ScopeOverlay.startRecoilEffect() for a little animation effect.
        @Override
        public void render(float delta) {
            setScopeMode(world.weaponState.scopeMode);
            ...
            if(world.weaponState.firing){
                world.weaponState.firing = false;
                if(world.weaponState.currentWeaponType == WeaponType.GUN && !thirdPersonView && !lookThroughScope)
                    gun.scene.animationController.setAnimation("Fire", 1);   // run the fire weapon animation once
                scopeOverlay.startRecoilEffect();
            }
            ...
            if(!thirdPersonView && world.weaponState.currentWeaponType == WeaponType.GUN && !lookThroughScope) {
                gunView.render(delta);
            }
            if(lookThroughScope)
                scopeOverlay.render(delta);
            gui.showCrossHair( !thirdPersonView && !lookThroughScope );
            gui.render(delta);
        }
The method to set the field of view in the GameView class is very simple:
        public void setFieldOfView( float fov ){
            cam.fieldOfView = fov;
            cam.update();
        }
This concludes step 14, allowing us to go into “sniper mode”.