3D Tutorial - Step 4 - Multiple objects
by Monstrous Software
Step 4 - Multiple objects
In the previous step, we loaded a GLTF file with one single object in it: the ground box.
Let us add some more items to the GLTF file and see how we can handle multiple objects.
The file step4a.gtlf contains a few more objects. You can see the file in Blender in the following picture.
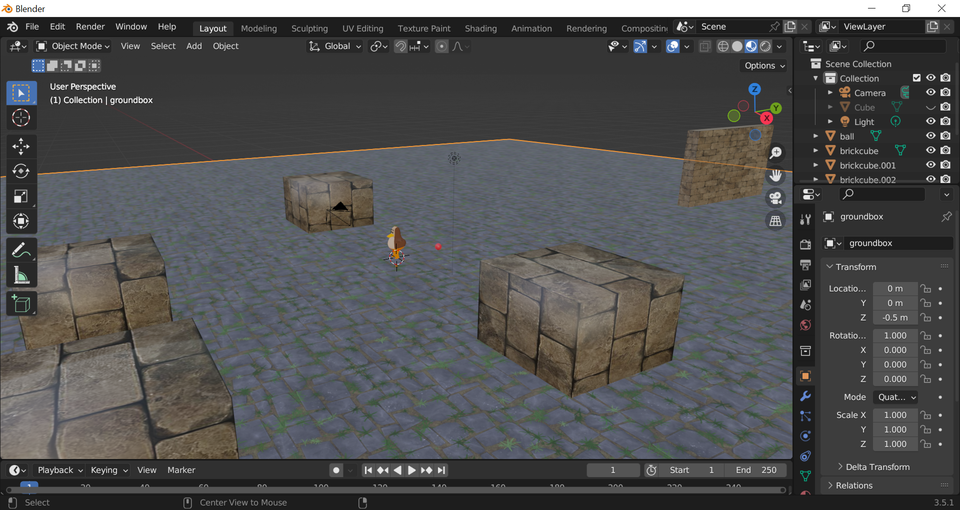
We see a number of blocks have been added, a wall, a red ball and a character.
Let’s see what happens if we load this file instead of the previous file. Replace the following line in GameScreen.java
sceneAsset = new GLTFLoader().load(Gdx.files.internal("models/step3.gltf"));
with the following:
sceneAsset = new GLTFLoader().load(Gdx.files.internal("models/step4a.gltf"));
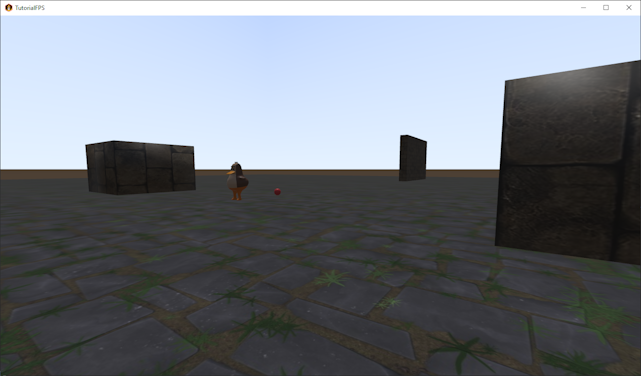
We can see all the objects in the file are rendered on screen, and we can walk around them (or indeed through them, because we don’t have any collision detection so far).
If we want understand a bit more about the content of the file we just loaded, we can print some debug statements. Add the following lines after loading sceneAsset:
        for(Node node : sceneAsset.scene.model.nodes){
            Gdx.app.log("Node ", node.id);
        }
When running the programme again, we see the following in the output console:
        [Node ] groundbox
        [Node ] wall
        [Node ] brickcube
        [Node ] ducky
        [Node ] ball
        [Node ] brickcube.001
        [Node ] brickcube.002
        [Node ] brickcube.003
This gives us the names of the objects we created in Blender (“ball”, “brickcube”) as names of nodes inside a single model.
Using the node names, we can be more selective in what we want to load from the GLTF file, we can just load specific objects. We can also use this to create multiple instances of objects in our program and put them in different locations or move them around.
Code Refactoring
But before we do this, it is time to refactor GameScreen which is getting a bit big now. We’ll try to follow, up to a point, a Model-View-Controller software pattern, in that we separate the internal representation of information (Model) from the presentation of that information to the user (View). Our Model will be represented the World class and the main view by the GameView class.
At the end of this refactoring the class GameScreen will be replaced by the following classes:
- GameScreen - for coordination
- GameView - for visualisation
- World - to store the game world content
- GameObject - to represent one game object
- Populator - to fill the world contents on start-up or reload
First we will create a class to correspond to a single game object, whether it be a piece of furniture, a projectile or an enemy character.
Let’s call this GameObject and create a GameObject class. For now, the GameObject class will just be a wrapper around the Scene class from gdx-gltf (which is itself a wrapper around ModelInstance from standard LibGDX). Later, we’ll add more attributes to this class:
            public class GameObject {

                public final Scene scene;

                public GameObject(Scene scene) {
                    this.scene = scene;
                }
            }
Next, we’ll create a class we’ll call World. The World class will contain all the game objects in the game world that we can see or interact with: the ground, the walls, the player, enemies, pick-ups, etc. The World class will not be involved in visualizing these objects, but keeps track of where everything is in our game’s three-dimensional space.
Now let’s create the World class. It will store an Array of GameObjects. The World class also keeps a reference to the game object that corresponds to the player character, because we’ll need to access this a lot. We also use a boolean (‘isDirty’) to keep track if the list of world objects has changed since the previous frame. We can use this to resynchronize the game view as needed.
    public class World implements Disposable {

        private final Array<GameObject> gameObjects;
        public GameObject player;
        private boolean isDirty;
        private final SceneAsset sceneAsset;

        public World(String modelFileName) {
            this.gameView = gameView;
            gameObjects = new Array<>();
            sceneAsset = new GLTFLoader().load(Gdx.files.internal(modelFileName));
            for(Node node : sceneAsset.scene.model.nodes){  // print some debug info on the file contents
                Gdx.app.log("Node ", node.id);
            }
            isDirty = true;
        }

        public boolean isDirty(){
            return isDirty;
        }

        private void clear() {
            gameObjects.clear();
            player = null;
            isDirty = true;
        }

        public int getNumGameObjects() {
                return gameObjects.size;
        }

        public GameObject getGameObject(int index) {
                return gameObjects.get(index);
        }

        private GameObject spawnObject(String name, Vector3 position){
            Scene scene = new Scene(sceneAsset.scene, name);
            if(scene.modelInstance.nodes.size == 0){
                Gdx.app.error("Cannot find node in GLTF", name);
                return null;
            }
            scene.modelInstance.transform.translate(position);
            GameObject go = new GameObject(scene);
            gameObjects.add(go);
            isDirty = true;
            return go;
        }

        public void removeObject(GameObject gameObject){
            gameObjects.remove(gameObject, true);
            isDirty = true;
        }

        public void update( float deltaTime ) {
                // to be written
        }

        @Override
        public void dispose() {
            sceneAsset.dispose();
        }
    }
In the above code, the spawnObject is used to create a scene corresponding to a node from the file and position it with a specific offset from its original position. If we use a zero offset then it will appear in the same position as in the model file (i.e. where it was placed in Blender). By providing a non-zero offset we can place a node in a different position.
You may also want to extend the spawnObject() method to not only give a position (translation) to each object but also an orientation (rotation). Internally, the position, orientation and the scale of a modelInstance is stored as a transform matrix which is a 4 by 4 matrix. The matrix can be manipulated through many methods. For example, transform.translate( Vector3 v ) adds a translation (change of position) by vector v. As another example, transform.rotate( Vector3 axis, float angle ) creates a transform matrix wuth which you can rotate the modelInstance by ‘angle’ degrees around the given axis.
Let us split off a class from GameScreen that is just focused on the rendering. Let us call this class GameView. The core of this new class will be the code we copied earlier from the gdx-gltf example. This class encapsulated the SceneManager which we use to render Scene objects. It also owns the perspective camera that we use for rendering. This class will provide some basic methods add() and remove() to add and remove Scene objects to the view. Other classes should not need direct access to the SceneManager, so we make it a private field.
Mostly this class can be written by moving lines of code out of GameScreen:
                public class GameView implements Disposable {

                    private final World world;                                // reference to World
                    private final SceneManager sceneManager;
                    private final PerspectiveCamera cam;
                    private final Cubemap diffuseCubemap;
                    private final Cubemap environmentCubemap;
                    private final Cubemap specularCubemap;
                    private final Texture brdfLUT;
                    private final SceneSkybox skybox;

                    public GameView(World world) {
                        this.world = world;
                        sceneManager = new SceneManager();

                        cam = new PerspectiveCamera(67, Gdx.graphics.getWidth(),  Gdx.graphics.getHeight());
                        cam.position.set(0f, Settings.eyeHeight, 0f);
                        cam.lookAt(0,Settings.eyeHeight,10);
                        cam.near = near;
                        cam.far = far;
                        cam.update();

                        sceneManager.setCamera(cam);

                        // setup light
                        DirectionalLightEx light = new DirectionalLightEx();
                        light.direction.set(1, -3, 1).nor();
                        light.color.set(Color.WHITE);
                        light.intensity = 2f;
                        sceneManager.environment.add(light);

                        // setup quick IBL (image based lighting)
                        IBLBuilder iblBuilder = IBLBuilder.createOutdoor(light);
                        environmentCubemap = iblBuilder.buildEnvMap(1024);
                        diffuseCubemap = iblBuilder.buildIrradianceMap(256);
                        specularCubemap = iblBuilder.buildRadianceMap(10);
                        iblBuilder.dispose();

                        // This texture is provided by the library, no need to have it in your assets.
                        brdfLUT = new Texture(Gdx.files.classpath("net/mgsx/gltf/shaders/brdfLUT.png"));

                        sceneManager.setAmbientLight(0.1f);
                        sceneManager.environment.set(new PBRTextureAttribute(PBRTextureAttribute.BRDFLUTTexture, brdfLUT));
                        sceneManager.environment.set(PBRCubemapAttribute.createSpecularEnv(specularCubemap));
                        sceneManager.environment.set(PBRCubemapAttribute.createDiffuseEnv(diffuseCubemap));
                        sceneManager.environment.set(new PBRFloatAttribute(PBRFloatAttribute.ShadowBias, 1f/512f)); // reduce shadow acne

                        // setup skybox
                        skybox = new SceneSkybox(environmentCubemap);
                        sceneManager.setSkyBox(skybox);
                    }

                    public PerspectiveCamera getCamera() {
                        return cam;
                    }

                    public void refresh() {
                        sceneManager.getRenderableProviders().clear();        // remove all scenes

                        // add scene for each game object
                        int num = world.getNumGameObjects();
                        for(int i = 0; i < num; i++){
                                Scene scene = world.getGameObject(i).scene;
                                sceneManager.addScene(scene);
                        }
                    }

                    public void render( float delta ) {
                        cam.update();
                        if(world.isDirty())
                            refresh();
                        sceneManager.update(delta);

                        // render
                        ScreenUtils.clear(Color.PURPLE, true);  // note clear color will be hidden by skybox anyway
                        sceneManager.render();
                    }

                    public void resize(int width, int height){
                        sceneManager.updateViewport(width, height);
                    }

                    @Override
                    public void dispose() {
                        sceneManager.dispose();
                        environmentCubemap.dispose();
                        diffuseCubemap.dispose();
                        specularCubemap.dispose();
                        brdfLUT.dispose();
                        skybox.dispose();
                    }
                }
The World class we have written does not define the contents of the game world. Let us create a separate class to fill the world with the object we want to see in it. By creating a separate class for this, we try to separate the specific contents of the world from the world logic.
Create a utility class called Populator and give it a static method called populate() which we can use to fill the world:
        public static populate(World world) {
            world.clear();
            world.spawnObject("groundbox", Vector3.Zero);
            world.spawnObject("brickcube", Vector3.Zero);
            world.spawnObject("brickcube.001", Vector3.Zero);
            world.spawnObject("brickcube.002", Vector3.Zero);
            world.spawnObject("brickcube.003", Vector3.Zero);
            world.spawnObject("wall", Vector3.Zero);
            world.spawnObject("ball", Vector3.Zero);
            world.spawnObject("ball", new Vector3(0,1,0));
            world.spawnObject("ball", new Vector3(0,2,0));
            world.player = world.spawnObject("ducky", Vector3.Zero);
        }
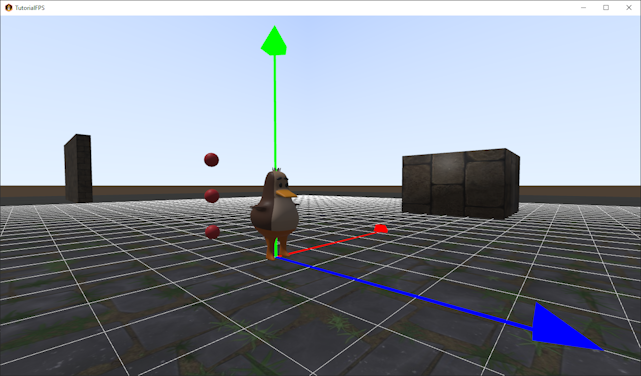
Here, for example, we spawn three ball object above each other: at (0,0,0), at (0,1,0) and at (0,2,0). Also note how we set the world’s player field to one of the game objects. The player object is also stored in the gameObjects array like all the others.
The Populator class does nothing but create objects in the world. You can imagine this could be extended to read this data from an external file and then you could perhaps provide different files for different levels in your game. For simplicity, we’ll just use these hardcoded definitions for now.

In GameScreen we create a private World object. We also create a private GameView object which is passed the World object in its constructor:
Add the following fields (the fields sceneAsset and sceneManager are no longer needed in GameScreen and can be deleted):
        private GameView gameView;
        private World world;
In the show() method of GameScreen we can create the game view and the game world and populate it as follows:
        world = new World("models/step4a.gtlf");
        Populator.populate(world);
        gameView = new GameView(world);
and get rid of the following lines which are now covered in the World class or GameView class:
        sceneAsset = new GLTFLoader().load(Gdx.files.internal("models/step4a.gltf"));
        Scene scene = new Scene(sceneAsset.scene);
        sceneManager.addScene(scene);
Update the render() method to use the following lines to update the state of the game world and render the game state:
        world.update(delta);
        gameView.render(delta);
in dispose():
        gameView.dispose();
        world.dispose();
Grid view
Sometimes it is handy to have a line grid for orientation during the development cycle. LibGDX has some built-in models to quickly create a line grid and XYZ arrows. We will render these outside of SceneManager, so we’ll create a ModelBatch for this. Because these models are only for a reference view, we’ll not put them in the game objects array.
Create a new class called GridView and add the following members to the class:
        private final ModelBatch modelBatch;
        private final Array<ModelInstance> instances;
        private final Model arrowModel;
        private final Model gridModel;
Create a constructor as follows:
        public GridView() {
            instances = new Array<>();
            modelBatch = new ModelBatch();
            ModelBuilder modelBuilder = new ModelBuilder();

            arrowModel = modelBuilder.createXYZCoordinates(5f, new Material(), VertexAttributes.Usage.Position | VertexAttributes.Usage.ColorPacked);
            instances.add(new ModelInstance(arrowModel, Vector3.Zero));

            gridModel = modelBuilder.createLineGrid(100, 100, 1f, 1f, new Material(), VertexAttributes.Usage.Position | VertexAttributes.Usage.ColorPacked);
            instances.add(new ModelInstance(gridModel, Vector3.Zero));
        }
Although we only use the two Model objects very briefly in the constructor to create a ModelInstance, we still need to define them as class fields, rather than local variables, in order to dispose them later. And also note, we should never dispose a Model while there are still ModelInstances in use that reference them.
Add a render method:
        public void render( Camera cam ) {
            modelBatch.begin(cam);
            modelBatch.render(instances);
            modelBatch.end();
        }
We have created some objects that should be disposed of, so make sure the GridView class implements Disposable and add a dispose() method
        @Override
        public void dispose() {
            modelBatch.dispose();
            arrowsModel.dispose();
            gridModel.dispose();
        }
Then in the GameScreen constructor create a GridView object, dispose of it in the dispose() method and add the following line at the end of the render() method:
gridView.render(cam);
This shows a reference grid and shows us the orientation of the world coordinate system (red, green, blue is X, Y, Z respectively).
Shadows
Let us add some shadows to the view. Add the following to the Settings class to set the size of the shadow map. A good size is a trade-off between the shadow resolution and the world size:
static public final int shadowMapSize = 4096;
Then in the GameView class replace the following line:
DirectionalLightEx light = new DirectionalLightEx();
by this code:
        DirectionalLightEx light = new net.mgsx.gltf.scene3d.lights.DirectionalShadowLight(Settings.shadowMapSize, Settings.shadowMapSize)
            .setViewport(50,50,10,100);
This replaces a normal directional light by a directional light that also casts shadows.
The shadow quality often requires some tweaking of the parameters involved.
Conclusion
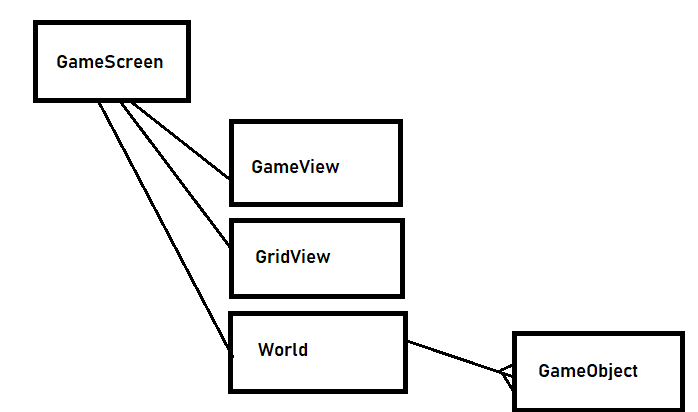
We have now refactored the project into more classes. The relationship between classes is now as follows: the GameScreen class contains an object of the GameView, the GridView and the World class. The World class contains an ArrayList of GameObject instances.
This concludes this step. We’ve added a more fine-grained loading of objects from the GLTF model file. We’ve seen how we can create multiple object instances.
We’ve separated out the representation of the game world from other game logic. We have introduced a generic game object class.
We can also notice some glaring shortcomings. The first person camera can walk right through brick walls, and we can see balls suspended in the air with no regard to gravity. We will need to add collision detection and some basic physics in the next step.