3D Tutorial - Step 3 - GLTF support
by Monstrous Software
Step 3 - GLTF support
In this step we will add support for the GLTF format so that we can import files from 3d modeling software such as Blender.
The GLTF file format is a more modern replacement for formats such as OBJ or FBX. Many LibGDX tutorials use the FBX format. This requires an extra step in your work flow, using the fbx-conv executable, to convert FBX to a file format that LibGDX can read (g3db or g3dj). GLTF gives better support for material properties (e.g. metallic or glossy surfaces) which allows you to have better looking models in your game. And support for skeletal animation in FBX is very basic (unless the rig is very simple, your animation will get corrupted).
We use the gdx-gtlf extension to support import of this file format and to support rendering with PBR (physically based rendering) shaders.
gdx-gtlf
We will use the quick start example of the gdx-gltf project as example. You can find it here GLTFQuickStartExample.java.
The gdx-gltf extension introduces the SceneManager class. This holds the camera, the rendering environment (lights, fog, etcetera) and all the objects to be rendered (called scenes). We will add the objects (scenes) to the SceneManager using addScene() and call SceneManager.render() at each frame to display them on the screen. You can think of a Scene as equivalent to the ModelInstance we saw earlier. It corresponds to one instance of a mesh at a specific position and with some specific orientation. The use of the SceneManager will replace the modelBatch and the instances array we used earlier. The SceneAsset class is used to represent the content of a loaded GLTF file.
We’ll need a lot of new fields in the GameScreen class:
        private SceneManager sceneManager;
        private SceneAsset sceneAsset;
        private Cubemap diffuseCubemap;
        private Cubemap environmentCubemap;
        private Cubemap specularCubemap;
        private Texture brdfLUT;
        private SceneSkybox skybox;
In the show() method add the following code to create a SceneManager and to add the contents from a GLTF file to the SceneManager.
        sceneManager = new SceneManager();
        sceneAsset = new GLTFLoader().load(Gdx.files.internal("models/step3.gltf"));
        Scene scene = new Scene(sceneAsset.scene);
        sceneManager.addScene(scene);
This replaces the following code from step 1 where we loaded textures, created a model and created a modelInstance.
        textureGround = new Texture(Gdx.files.internal("textures/Stylized_Stone_Floor_005_basecolor.jpg"), true);
        textureGround.setFilter(Texture.TextureFilter.MipMapLinearLinear, Texture.TextureFilter.Linear);
        textureGround.setWrap(Texture.TextureWrap.Repeat, Texture.TextureWrap.Repeat);
        TextureRegion textureRegion = new TextureRegion(textureGround);
        int repeats = 10;
        textureRegion.setRegion(0,0,textureGround.getWidth()*repeats, textureGround.getHeight()*repeats );

        ModelBuilder modelBuilder = new ModelBuilder();

        // create models
        Model modelGround = modelBuilder.createBox(100f, 1f, 100f,
            new Material(TextureAttribute.createDiffuse(textureRegion)),
            VertexAttributes.Usage.Position | VertexAttributes.Usage.Normal | VertexAttributes.Usage.TextureCoordinates);

        // create and position model instances
        instances = new Array<>();
        instances.add(new ModelInstance(modelGround, 0, -1, 0));	// 'table top' surface

        modelBatch = new ModelBatch();
Add the camera to the scene manager:
sceneManager.setCamera(cam);
Now set up lighting and a skybox. This is copied straight from the Quick Example code. DirectionalLightEx is a gdx-gltf extension of LibGDX’s standard DirectionalLight. It mimics a light that is infinitely far away; it has no position, only a light direction.
        // setup light
        DirectionalLightEx light = new DirectionalLightEx();
        light.direction.set(1, -3, 1).nor();
        light.color.set(Color.WHITE);
        light.intensity = 3f;
        sceneManager.environment.add(light);

        // setup quick IBL (image based lighting)
        IBLBuilder iblBuilder = IBLBuilder.createOutdoor(light);
        environmentCubemap = iblBuilder.buildEnvMap(1024);
        diffuseCubemap = iblBuilder.buildIrradianceMap(256);
        specularCubemap = iblBuilder.buildRadianceMap(10);
        iblBuilder.dispose();

        // This texture is provided by the library, no need to have it in your assets.
        brdfLUT = new Texture(Gdx.files.classpath("net/mgsx/gltf/shaders/brdfLUT.png"));

        sceneManager.setAmbientLight(1f);
        sceneManager.environment.set(new PBRTextureAttribute(PBRTextureAttribute.BRDFLUTTexture, brdfLUT));
        sceneManager.environment.set(PBRCubemapAttribute.createSpecularEnv(specularCubemap));
        sceneManager.environment.set(PBRCubemapAttribute.createDiffuseEnv(diffuseCubemap));

        // setup skybox
        skybox = new SceneSkybox(environmentCubemap);
        sceneManager.setSkyBox(skybox);
This replaces the previous code from step 1:
        environment = new Environment();
        environment.set(new ColorAttribute(ColorAttribute.AmbientLight, 0.6f, 0.6f, 0.6f, 1f));
        environment.add(new DirectionalLight().set(0.8f, 0.8f, 0.8f, -1f, -0.8f, -0.2f));
Now in the render() method we replace the use of modelBatch by calling scene manager’s render() method.
Instead of this:
        modelBatch.begin(cam);
        modelBatch.render(instances, environment);
        modelBatch.end();
we now use this:
        sceneManager.update(delta);
        sceneManager.render();
In the resize() method we can replace the following code:
        cam.viewportWidth = width;
        cam.viewportHeight = height;
        cam.update();
by a call to scene manager’s updateViewport() method:
        @Override
        public void resize(int width, int height) {
            sceneManager.updateViewport(width, height);
        }
And in the dispose() method we now have a lot of disposing to do:
        @Override
        public void dispose() {
            sceneManager.dispose();
            sceneAsset.dispose();
            environmentCubemap.dispose();
            diffuseCubemap.dispose();
            specularCubemap.dispose();
            brdfLUT.dispose();
            skybox.dispose();
        }
We can get rid of fields environment, modelGround, textureGround, instances and modelBatch because they are no longer used.
To run the programme add the supplied files in the assets\models directory: step3.gltf, step3.bin and the textures subdirectory.
When we run the programme, we may notice some clipping when we look down because the camera’s near clipping plane is too far. In method show(), modify the near distance from 1 to 0.1f:
cam.near = 0.1f;
Blender
Instead of creating models in code as we did in the step 1 using the ModelBuilder class, we can now use modeling software and import model files. We can build the model file using free software like Blender.
Install Blender from blender.org and open up the included Blender file ‘step3.blend’.
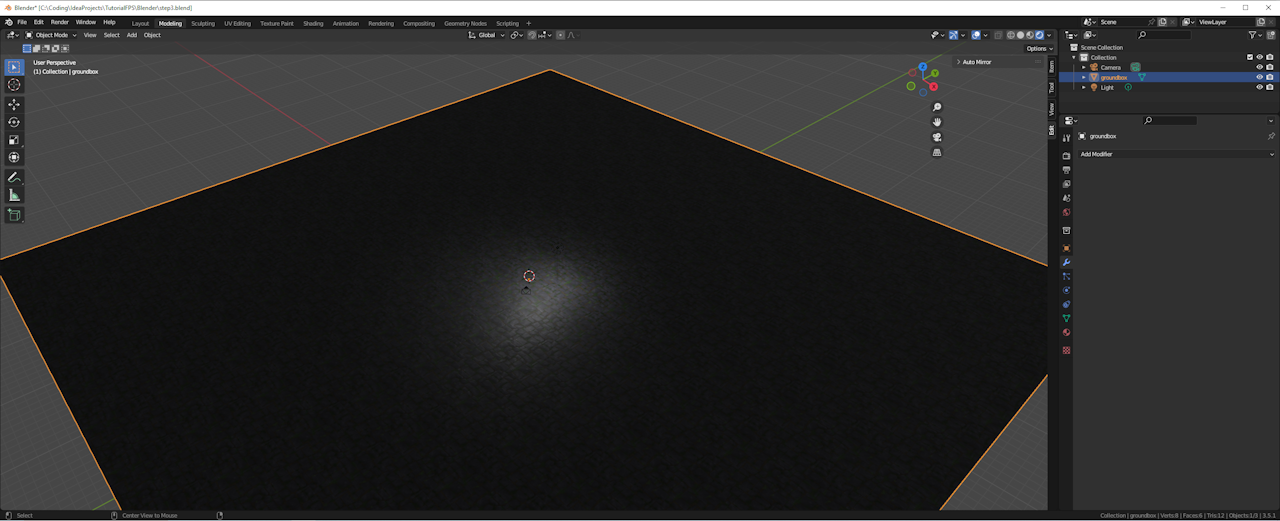
You can see we created a box of 100 by 100 by 1 units in size and applied a texture to it.
To export from Blender to the GLTF format use the following procedure:
-
Select the ground box object in Blender (or in general select all the objects you want to export)
-
Use the menu option File/Export and select the format ‘glTF 2.0 (.glb.gltf)’.
-
Navigate to the project folder, then navigate to folder ‘assets\models’ and apply the name ‘step3.gltf’.
-
Select format ‘glTF separate’ and type in a subfolder name for the textures to go in, e.g. ‘textures’ to reduce the clutter a bit.
-
Then hit the export button. If you switch back to Intellij, you should now see additional files in the assets/models folder: a new file called
models.gltf, a file calledmodels.binand a subfolder with the textures inside.
This is the file we load with the line we saw earlier:
sceneAsset = new GLTFLoader().load(Gdx.files.internal("models/step3.gltf"));
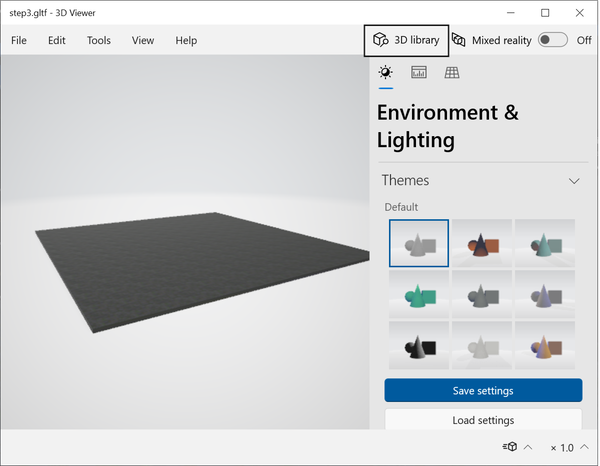
The GLTF format is a standard format to exchange 3d models between different software products. Windows 10 and Windows 11 have a standard 3D viewer that allows you to view GLTF files, just by clicking on them.
Conclusion
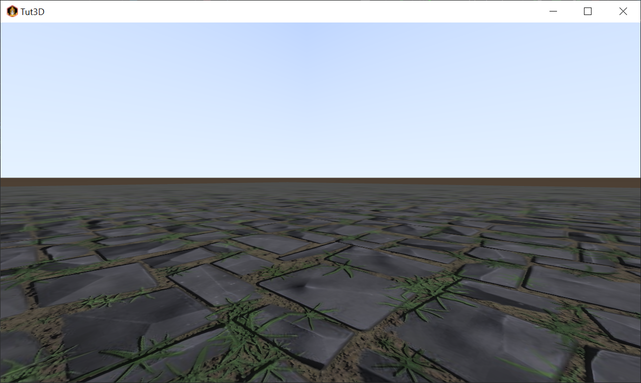
You should now be able to run the program. Again we can walk over a large texture block.
Now the block is imported from an external file though instead of built by our code. This opens up the avenue
to use far more complicated models. Also animated models are supported.
Using the gdx-gltf extension also upgrades the default libGDX shader to PBR (physically based rendering) shaders. This allows much more realistic materials, including metallic effects, reflectiveness, etcetera.