Post Mortem – “Get the Heck Out”
September 2024
This is the post mortem for the making of a game for the September 2024 LibGDX game jam #30. In the game jam you must develop a LibGDX game in one week following a given theme and for bonus points include an easter egg.
I already had the idea to make an indoor first-person game and maybe have some killer robots. At this point I was thinking of a Doom style boss level where you have to dodge rockets, something like E3M8 where you have to beat the spider mastermind. To somehow shoehorn in the theme (the four elements) they would be objects to collect.
In the game you must find the four cards representing the four elements in a labyrinthine level, avoid getting shot by patrolling robots and then leave through the exit door which is only opened once all four cards have been found. You can play the game on itch.io.
The easter egg (aggressive banana) appears as a poster in one of the rooms featuring an old friend: the anthropomorphic banana from “Under the Sea” (jam #25).
Patrol Bot
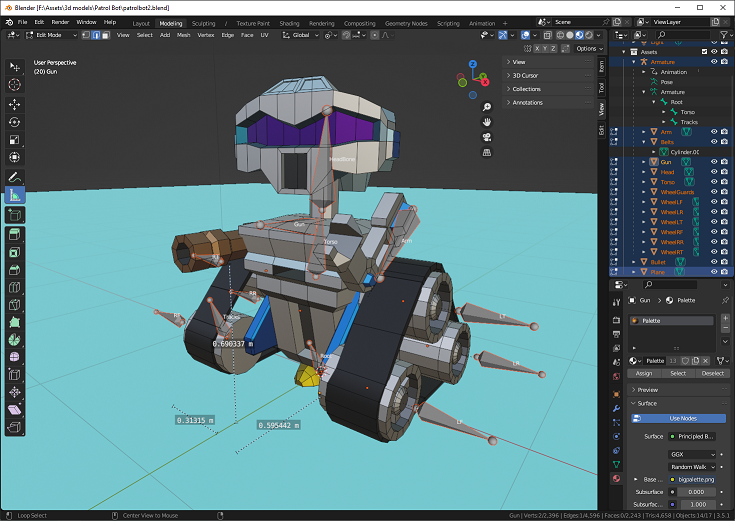
At this point I modeled a small, tracked robot in Blender. The robot would move on two triangular tracks, each around three wheels (a bit like Wall-E as I realized later). It would have a body and a head that could swivel.
An armature was added to add some animation. Each of the six wheels got its own rotator bone.
I discovered you can link rotations of different object with each other via so-called drivers. So that you only need to rotate one wheel at each side and the other wheels would follow. And in fact. I got it working. This could be a time saver. However, these drivers are not exported with the model or the animation, so they were no good for game models.
Although it is tempting to model the track as an array of intersecting links, this would not be a good idea. I did that in the past and the result looks really cool, but the poly count goes way through the roof and it would be too much for the game to render in real-time.
A few animations were added: forward roll, fire and idle. There is also a cool collapse animation which in the end was never used.
Level design
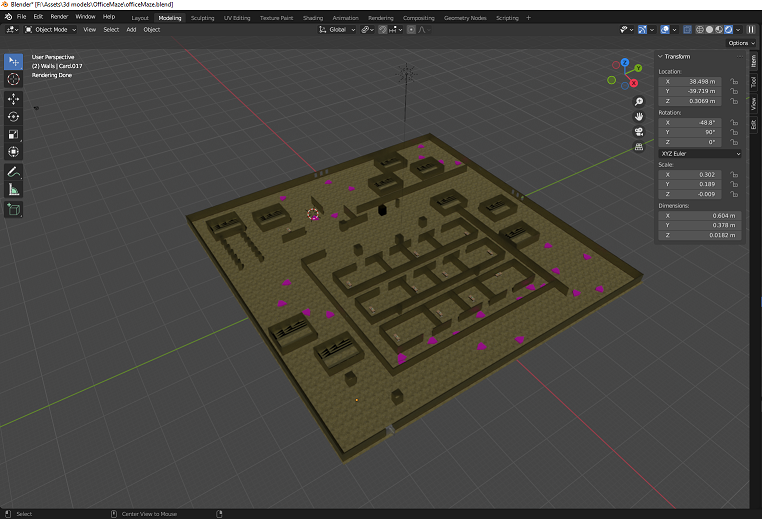
One of the early questions was what method to use to model the level. The level would consist of walls, corridors and rooms in a confined space.To simplify matters the map would essentially be 2d, there would be no bridges, rooms above other rooms, etc.
One of the options was to use a Doom-style level editor that I worked on some time ago, but it was still very incomplete and there would not be time enough to remedy this.
Another option was to use any of the available Doom level editors, but this would mean I would spend a lot of time parsing a proprietary file format (WAD files) to import it into the game.
Another option I’ve used in the past is to model some basic building blocks in Blender and then place them in code to construct a level. This works well for a randomly generated level.
In the end, I selected to model the level completely in Blender. There would still be some basic building blocks (wall, pillar, desk) but in Blender it is very fast to copy and move objects. The level is exported as a GTLF file and read into the game using the gdx-gltf extension. To keep the size reasonable, I made a lot of use of duplicated instances instead of copies (Alt-D instead of Shift-D). This means if you have twenty similar walls, they can all share the same mesh, just moved to different positions.
An early demo was commented to have a bit of a creepy “backrooms” vibe.
The Backrooms is a bit of an internet cult spun off from a photo of an abandoned office space with yellowing wallpaper posted on 4chan. More on the back rooms here vice.com
I looked a bit more into the backrooms meme and decided to lean into this, using the same wallpaper design, dirty carpet and general aesthetic.
Screen Effects
The popular “backrooms found footage” videos by Kane Pixels are presented as low- quality VCR recordings, so I adapted the TV noise shader from the “Fright Night” intro (which in turn is based on a ShaderToy demo by RafaSKB) and a blur filter as a post-processing pass. The 3d scene is rendered to a frame buffer, and then shaders are applied to manipulate the image and finally the frame buffer is rendered to the screen.
If the player is hit by a bullet, a quick flash of red is added to the whole screen using the shader.
Camera sway
To simulate the handheld camera effect the camera’s up vector is tilted depending on the camera’s position using some sine waves using the camera position as input. This effect is probably quite nauseating for many people, so it can be switched off in the options menu (camera stabilization). This swaying is in addition to head bobbing which is moving the camera up and down when moving.
Robot paths
When the robots are not in attack mode, they loop around a fixed path. The path is defined in Blender by placing a set of way points. These are shaped as pink triangles pointing in the direction of movement. The way points are hidden in the game by disabling the nodes. They are named systematically so that WayPoint1, WayPoint1.001, WayPoint1.002 etc. refer to robot 1 and WayPoint2, WayPoint2.001, WayPoint2.002 refer to robot 2. When the World class parses a level, it collects groups of way points related to the same robot and uses the way point positions as control points to create a Catmull Rom spline that runs through these locations. The patrol bot code just advances through the spline, updating its position and direction for every frame.
At first, I used a spline of 3d vectors (Vector3) and I had some difficulty translating the spline derivative to a robot orientation. Then I realized that the path is in essence a 2d path because the robots always stay in the same horizontal plane and I used a spline of 3d vectors (Vector2) instead. The spline derivative at time t is then a 2d vector pointing in the direction the robot is going and this can easily be translated to a rotational transform matrix which is then translated to the robot position.
Perhaps there is a better way to export a spline from Blender to libGDX but I didn’t look into that.
One thing I’ve noticed about the spline path is that the robot speed depends on the distance between control points. It will suddenly speed up if control points are placed far apart so this is something to keep in mind when placing the control points.
Robot AI
The robot AI is very simple. Normally they will just follow their patrol route. However, if they see the player they go into attack mode.
The robot sees the player if the distance is below a threshold, if the player is somewhat in front of them and if a ray cast from the robot to the player position does not intersect any walls (using Ray vs Bounding Box tests).
In attack mode, the robots will turn towards the player ‘s position while firing bullets.
If the robot can no longer see the player or the player is dead, the robot will go into idle mode for a few seconds and then resume its patrol.
The robots will not chase the player so we don’t have to worry about obstacle avoidance, path finding or how the robot will return to its patrol route.
Collisions
As with many games, we need to detect and respond to collisions. In this game, the collision checks only have to cater for a few combinations. We want to prevent the player from walking through walls and bullets from travelling through walls. So we need to check if the player collides with static level elements (walls, desks, cards, the exit door) and if bullets collide with level elements and with the player.
Since the physics in this game are very simple, I decided not to make use of a physics library such as Bullet or ODE4j. These libraries are very powerful and very efficient but there is a lot of code needed to integrate them into your game.
When the level is loaded, we create an array of Collider objects by parsing all the nodes of the level’s model instance. Each collider object stores an axis-aligned bounding box corresponding to a node (e.g. a wall). We filter out ceiling and floor nodes because we don’t want to collide with them. There is no collider for the player or for the robots, all the colliders are static. Some colliders get a special flag associated with them depending on the node’s name because we want a special reaction on collision, e.g. to pick up a card or to go through the exit door.
Before moving the player, we check if a cylinder around the new position intersects with any of the colliders’ bounding box. By using a cylinder with a radius of 50 cm we account for the volume of the player character. If we’d used a bounding box for the player instead, we could get snagged on corners. Bear in mind, the movement all takes place in the same horizontal plane, so actually we are checking a circle against axis-aligned rectangles. An efficient way to perform such a test is decribed here: stack overflow
If there is no collision, we can move to the new position. If there are one or more colliders intersected, we have a collision. As a collision response, we work out a new velocity vector for the player that will prevent penetration of the collider. For example, if the player collides with the north wall of a room, we remove the velocity component towards the north. It will still allow the player to slide along a wall. In the case of a player moving into a corner, there are collisions with two walls and the player will stop moving entirely. (Initially I had a bug because I was only checking for a single collider and then you could clip through an inside corner.) For bullet movement, we do the same type of collision detection with the static colliders. For collision response, we simply delete the bullet. To test if the bullet hits the player, we do a simple proximity test and if close enough let the player take damage and delete the bullet. This simple collision detection has its limitations:
- For every collision check we iterate through all the colliders. This happens every frame for the player and for every bullet. There are about 100 colliders constructed from the level. It’s a brute force approach that won’t scale well for a bigger level. It could be optimized by clustering colliders by area, e.g. use a hash table to group colliders by grid cell and then you would have to check far fewer colliders. You can find this implemented in Oz Racer.
- We use axis-aligned bounding boxes. All the walls in the level must be placed at right angles. A wall at 45 degrees (as seen from above), would cause the player to bump into invisible boundaries. This could be remedied by using oriented bounding boxes as a second level collision check.
- There is no collision check between robot and walls. The robot doesn’t need to perform collision checks as it is on a fixed path. Robots do a simple proximity test for collision with the player.
- There are some walls with windows, but bullets cannot fly through the windows, because obviously they are of bulletproof glass.
Spawn points
To add a little bit of replay value, the element cards should not always appear in the same position. For this, I distributed multiple copies of the cards in the level using Blender. On loading the level, the game randomly selects four of the locations and places the cards there. The additional cards are removed.
Difficulty setting
If you have played the game a few times, it becomes easier. You become familiar with the level layout, you know where the robots hang out, you know their blind spots so you can sneak around them, and you’ve gained the skill to avoid the bullets by moving fast and strafing. To keep a bit of a challenge, I added an extra difficulty setting (“Hurt me plenty”) in the options menu. This will double the fire rate of the robots, the robots will turn more than 3 times as fast, they can see at a wider angle, the bullets do more damage (50% instead of 20%).
Sound
Sound can be an important clue on the whereabouts of the enemies, so I looked to implement some 3d audio effects. There are some advanced audio libraries available for LibGDX, but they don’t seem to be platform independent and seem to be too complicated for what I want. So, I implemented a 3d effect by reducing the volume of a sound depending on the distance to the camera and by panning the sound from left to right depending on the angle from the camera direction to the sound source. The effect is most noticeable with the patrolling robots, but you can also hear the bullets buzzing past left of right. It is best experienced with headphones.
Lighting
The lighting is pretty basic in this game. Since it is indoors, there is no directional light acting as a sun. The overhead lights are modelled with an emissive material to show a glow (which is made more pronounced by the blur post-processing shader), but they are not actually contributing light to the scene. There is a spotlight acting as torch. It moves with the camera. It can be toggled with a key. While it is on, the battery slowly drains. When it is switched off, the battery somehow magically recharges. A horizontal progress bar in the shape of a battery shows the status.
Music
To add to the eerie atmosphere, I used some royalty free music found on Pixabay labelled “elevator music bossa nova” by Lesfm (Oleksii Kaplunskyi ) for a nostalgic but abandoned feel. I used Audacity to make it sound creepy rather than cheery: adding lots of echo and reverb and slowing it down. The original version is played once the game is completed.
Source
The source code can be found on github (once cleaned up): source code