Using WSL to test LibGDX apps on Linux
Introduction
This is a write up of installing Linux on Windows 10 using WSL (Windows Sybsystem for Linux) in order to test if cross-platform LibGDX apps will work on Linux. Using WSL is perhaps easier to work with than a dual boot solution. You can have Linux and Windows applications side by side. You can compile under Windows and then immediately run it under Linux.
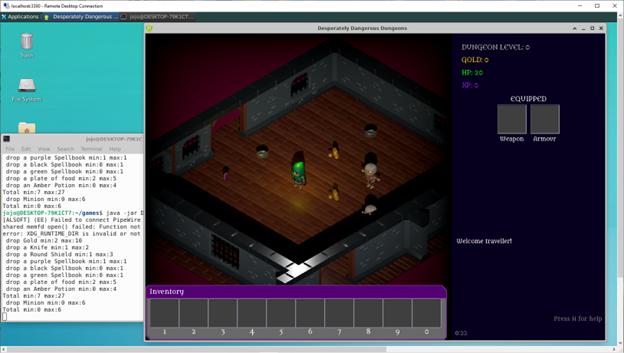
Image: A LibGDX jam game on a Linux desktop within Windows 10
Step 1: Install WSL on Windows
Instructions are provided in this Microsoft article.
First find “Turn Windows features on and off” by typing it in the search bar.
Enable the checkbox for:
- Virtual Machine Platform
- Windows Subsystem for Linux
You need to be running a recent version of Windows 10 or Windows 11. Open Powershell as administrator and run the following command:
wsl --install
Update WSL to the latest version using
wsl --update
See a list of available Linux distributions with the following command:
wsl --list --online
And install, for example, a recent version of Ubuntu using:
wsl --install -d Ubuntu-24.04
Once it has finished installing, you will be prompted to choose a username and a password for this Linux system. Remember them well because you will be using them a lot in the next steps.
You will now have access to the Ubuntu operating system via a command terminal using the bash shell.
You can enter this terminal window at any time by typing wsl from the Windows Search bar.
Use the following command in Powershell to make sure Ubuntu uses WSL2 rather than WSL1:
wsl -l -v
   NAME      STATE           VERSION
* Ubuntu    Stopped         2
If it should say version 1, use the following command to upgrade to WSL version 2 which is much more performant for graphics and audio:
wsl --set-version Ubuntu 2
Step 2: Java run-time
To distribute a LibGDX game, there are different methods. See LibGDX - Deploying your Application.
One popular method is as a “fat jar” which is cross-platform and should run anywhere that can run java. A “fat jar” means the jar file includes all its dependencies (jar files from other libraries such a LWJGL3 and GLFW for example), so that it can be run stand-alone.
This is done with the following Gradle command from your development environment (usually from your IDE)
./gradlew lwjgl3:dist
The generated JAR file will be located in the lwjgl3/build/libs/ folder and contains all necessary code and all your art assets.
Since this is a fresh install of Ubuntu, java will not be available. If you type the java command in the shell you will get an error message because it cannot be found. We need to install a Java run-time environment. Note: we are only using the Linux environment for testing, not for development so we don’t need thee Java development kit (JDK).
The following command in the Linux terminal installs the default JRE:
$ sudo apt install default-jre
The apt tool is the advanced package tool that is used to download and install software.
The sudo prefix means you are running this command with administrator rights and therefore you may be prompted to enter your linux password.
When I ran it, the command produced some errors as it could not find some packages, but also made a suggestion on how to fix it:
E: Failed to fetch http://archive.ubuntu.com/ubuntu/pool/main/a/alsa-ucm-conf/alsa-ucm-conf_1.2.10-1ubuntu5.3_all.deb  404  Not Found [IP: 185.125.190.82 80]
E: Failed to fetch http://security.ubuntu.com/ubuntu/pool/main/o/openjdk-21/openjdk-21-jre-headless_21.0.5%2b11-1ubuntu1%7e24.04_amd64.deb  404  Not Found [IP: 185.125.190.82 80]
E: Failed to fetch http://security.ubuntu.com/ubuntu/pool/main/o/openjdk-21/openjdk-21-jre_21.0.5%2b11-1ubuntu1%7e24.04_amd64.deb  404  Not Found [IP: 185.125.190.82 80]
E: Unable to fetch some archives, maybe run apt-get update or try with --fix-missing?
So let’s follow the advice:
$ sudo apt update
And try again
$ sudo apt install default-jre
This time it runs without errors, let us check the result and see the java version we’ve installed:
$ java -version
openjdk version "21.0.7" 2025-04-15
OpenJDK Runtime Environment (build 21.0.7+6-Ubuntu-0ubuntu124.04)
OpenJDK 64-Bit Server VM (build 21.0.7+6-Ubuntu-0ubuntu124.04, mixed mode, sharing)
We can see it installed the OpenJDK runtime environment for Java version 21.
Step 3: Installing a windows manager
If at this point we import a libGDX test application and try to run it, it will fail with an error:
$ java -jar test.jar

error: XDG_RUNTIME_DIR is invalid or not set in the environment.
[LWJGL] GLFW_PLATFORM_UNAVAILABLE error
…
The problem is that we are running in a console, but we need a windowing environment to run applications with a graphical interface. There are many window managers available under Ubuntu, popular ones are GNOME and KDE. We will instead install a very lightweight one, called xfce4, that should be sufficient for our needs.
For this we can follow the steps from the following Youtube video by Ksk Royal How To Install Ubuntu 24.04 On Windows 11 Using WSL With GUI (NEW GUIDE):
Use apt update to download the latest version of the package list.
$ sudo apt update
Use apt upgrade to install updates for any outdated package which is already on your system.
$ sudo apt upgrade -y
The last command results in some errors:
Reading package lists... Done
Building dependency tree... Done
Reading state information... Done
Calculating upgrade... Done
0 upgraded, 0 newly installed, 0 to remove and 0 not upgraded.
18 not fully installed or removed.
After this operation, 0 B of additional disk space will be used.
Setting up systemd (255.4-1ubuntu8.6) ...
Failed to take /etc/passwd lock: Invalid argument
dpkg: error processing package systemd (--configure):
 installed systemd package post-installation script subprocess returned error exit status 1
Errors were encountered while processing:
 systemd
E: Sub-process /usr/bin/dpkg returned an error code (1)
After some googling, I found this is a known issue with WSL that is reported on the Microsoft issue tracker:
The work-around is to replace the program systemd-sysusers with a dummy. We don’t need to create system users or system groups, so skipping this
command is fine. We copy the original binary from the /bin folder to the temporary folder, just in case.
Then we create a symbolic link with the name systemd-sysusers to refer to the echo binary. This means this command will effectively do nothing but print a line to the console.
Replacing this binary is easier than commenting out all the different places in the scripts where systemd-sysusers is called, but that could be another solution.
$ cd /bin
$ sudo mv -f systemd-sysusers /tmp/
$ sudo ln -s echo systemd-sysusers
$ cd ~
Try again, now it should work:
$ sudo apt upgrade –y
Now to install the desktop environment, in this case xfce4 and some related tools and assets:
$ sudo apt install xfce4 xfce4-goodies -y
Follow the instructions from the video to change some configuration. We make a backup of the configuration file just in case and
then use sed (stream editor) to find and replace some strings in the file. Alternatively, you could make these changes in an editor by hand.
The changes are to modify the port number for the windows server to 3390 (we will see this again later)
and to set the bits per pixel to the value 128 which is supposed to improve performance.
$ cd /etc/xrdp
$ sudo cp xrdp.ini xrdp.ini.bak
$ sudo sed -i 's/3389/3390/g' xrdp.ini
$ sudo sed -i 's/max_bpp=32/~max_bpp=32\nmax_bpp=128/g' xrdp.ini
$ sudo sed -i 's/xserverbpp=24/#xserverbpp=24\nxserverbpp=128/g' xrdp.ini
Next we make some changes to the startup script.
$ sudo nano /etc/xrdp/startwm.sh
(Comment out the last two lines and add a line at the end with the command `startxfce4`)
Running the window manager
Now to start the window manager, run the following commands (for frequent use you may want to put these two commands in a shell script):
$ export DISPLAY=:0
$ sudo /etc/init.d/xrdp start

 * Starting Remote Desktop Protocol server
You will not see anything happening at this moment, because the window manager runs as a server and we will use a Windows client to connect to it.
Go to Windows and start Remote Desktop Connection from the Start Menu. Fill in address localhost:3390 and provide your WSL username and password.
At this point a new window should open with a desktop environment.
Testing a LibGDX application
On the desktop environment, you have some applications available via the menu, such as a File manager and Web Browser and a Terminal Emulator. You can also rightclick on the desktop for a context menu or use the icon bar at the bottom of the screen.
Note: if selecting Terminal Emulator doesn’t open a command window, make sure that under Settings/Default Application the default Terminal Emulator is set to Xfce Terminal.
Open a terminal window in the linux desktop, and change directory (cd)to where the fat jar file is (your project’s lwjgl3/build/libs/ folder).
Note that you have access to your Windows file system via directories /mnt/c for the C:\ drive, /mnt/d for the D:\ drive, etcetera.
Alternatively, you can also use the graphical file manager to copy the jar file to your home directory and work from there.
Then run the jar file (let’s call it appname.jar) by calling java:
$ java –jar appname.jar
and hey presto! The LibGDX application should open in a new window within the xfce4 desktop.
Conclusion
We have found an easy way to test if your LibGDX application works in a Linux environment, without the need for a separate computer or dual-booting. Because the Linux environment appears within a Windows window, it is fast to switch between the operation systems. For example, to build the application using your Java development environment under Windows and then switching to the xfce4 desktop to run it.
If you spot any mistakes or have some additions, please leave a comment below.