Post Mortem “Oz Racer”
April 2024
Oz Racer was made for libgdx game jam #28 with the theme “underworld”.
Theme and Easter Egg
I already had in mind to make do something with high speed racing through a canyon on a hover ship, a mix between Star Wars pod racers and WipeOut. To capture the theme, I leaned into a comment by James on the libGDX discord that underworld could be linked to Australia. An AI generated Mad Max narrator character with what were supposed to be racing goggles completed the theme, and provided a way to cover the Easter egg ‘crazy cat’, by giving him that as nickname. Finally, as a little joke, the rendering is performed upside down, unless you use the menu option to adapt the monitor orientation for your region.
Terrain
The terrain is based on Perlin noise, similar to what I used in “Base Invaders” and “Pixel War”, but here we support almost infinite terrain by creating terrain chunks on the fly.
The Terrain class keeps a hash table of terrain chunks, creates new chunks as the camera moved into new terrain and deletes old chunks as necessary. For each frame, it updates the list of terrain chunks in the viewing frustum. A terrain chunk is generated by obtaining a heightfield from the Perlin noise generator and converting it to a triangle mesh. We use very basic Perlin noise without layering multiple octaves of noise (fractal Brownian motion), since we are just looking for some gentle slopes. The mesh is used to create a ModelInstance which is encapsulated as a (gdx-gtlf) Scene. At first, the terrain chunk scenes were embedded as GameObject instances, following the philosophy that everything in the game is a game object. Soon I realized the overhead brought no benefit for these static objects and now the terrain chunk scenes are directly taken from the Terrain class and inserted into the SceneManager. Pragmatism beats philosophy.
The chunks can be generated fast enough that there is no noticeable stutter even when generated inside the rendering thread. The terrain chunks are not encapsulated into Game Objects, A debug view shows the chunks in the cache and chunks in view.

- Figure 1: dark tiles are terrain chunks in cache, light tiles are in view
The infinite terrain is maybe a bit overkill for this game as all the action happens in a relatively small area, but it elegantly solves the problem of what to do at the edge of the world without breaking immersion. In this case the player can just travel for a very long time through an empty desert until they get bored and turn around. In “Fright Night” there was very noticeable edge of the world with an invisible boundary. In “Base Invaders” there was a fence placed around the play area to mask the world edge.
Rocks
The rock field is generated by randomly placing different rocks in a square area using a Poisson disk distribution to evenly space out rocks as much as possible. There is a central rock field and a secondary larger rock field with lower density just to scatter some rocks around the general area.
There are only 5 rock models which I quickly mocked up in Blender. They are rotated and scaled randomly to give the appearance the rocks are all different. The random number generator is seeded with a constant value so that the rocks appear the same every time you play the game.
Wind Turbines
For no particular reason at all, but just because I thought it looked cool and I was procrastinating, I decided to scatter some wind turbines around the area. These are also placed using a Poisson disk distribution. The blades of the wind turbine are a separate model and these are rotated via the world update method.
World versus View
As in previous projects, I have tried to keep the state of the game world in a World class and keep the rendering logic in a GameView class. The World class keeps track of where things are and what happens if they go somewhere else. The GameView class puts it on the screen. Logically, therefore the camera and the SceneManager are members of GameView. The array of GameObjects, the terrain, the rocks, the wind turbines are members of the World class. The CameraController is part of the GameView class and the PlayerController is part of the World class. Every frame the GameView class clears the SceneManager and add all the (visible) scenes from the World class. This happens in the refresh() method. This seems like an expensive thing to do, but under the hood SceneManager#addScene just adds the provided Scene to an internal Array so it is very fast.
Input Controllers
There are separate input controllers for the camera and for the racer (i.e. the player).
I spent a lot of time on the player controller to give smooth control over the hover ship. Inputs come either from the keyboard (W, A, S and Space for a nitro boost) or from a game controller. The steering rotates the ship around the up vector. It also rotates the ship around the longtitudinal axis for a banking effect which is purely cosmetic. This game doesn’t make use of a physics library. Just some simple high school physics to move the racer: acceleration, velocity and position. Every timestep the acceleration affects the velocity vector and the velocity vector affects the position vector. The ship builds up some momentum so that releasing the throttle (A key) does not make it come to an instant standstill. The throttle adds some acceleration to the ship’s velocity. On the other hand, there is a drag factor, proportional to the speed, which decelerates the ship.
The camera controller keeps the camera tracking some distance behind and above the racer. At the start of a run we set an increased distance which then smoothly returns to the nominal distance to give a cinematic zoom in effect. It is possible to zoom in and out with the mouse wheel.
We use the camera’s lookAt method to point the camera a bit to the front of the racer instead of at the racer itself. This way the racer appears at the bottom half of the screen and the camera is focused on the path in front.
There is a simple camera shake effect which is triggered on a collision. This temporarily adds some randomized height offset to the camera.
While the nitro boost is used, the field of view is increased to give the feel of extra speed.
An effect which I thought about, but finally did not implement, would be to use some shader tricks for a radial blur during nitro boost.
Multi-sampled frame buffer objects
It was clear from all the jaggies of the gently sloping sand dunes against the blue sky that this game badly needed anti-aliasing.
In previous game jams, I’ve had to choose between post-processing shader effects or anti-aliasing. Since very recently, the libGDX snapshot supports frame buffer objects (FBO) with multi-sampling, so we can now do both. The game view is rendered to a multi-sampled frame buffer. Then this frame buffer is transferred to a regular frame buffer object after which we can apply full screen shader effects (e.g. vignette effect and contrast enhancement) and put it on the screen.
The multi-sampled FBO is only available from GL ES 3.1+, so this needs to be requested in the launcher code with configuration.setOpenGLEmulation() and it is also only available for the lwjgl3 back-end. If it is not available, the renderer falls back to just using a normal FBO.
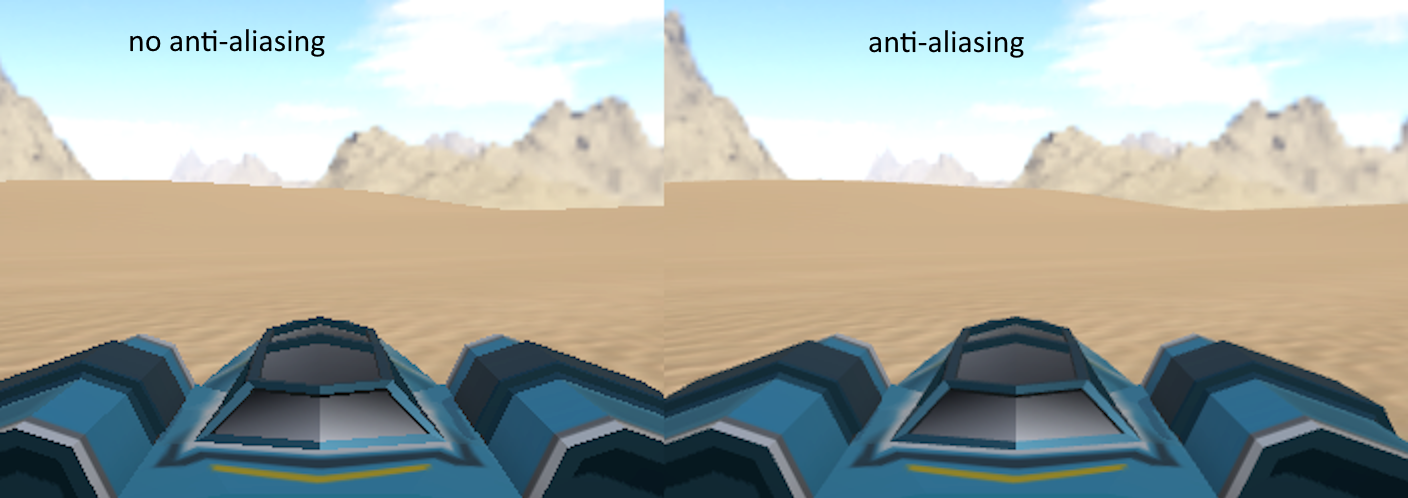
- Figure 2: comparison of anti-aliasing, note the jagged lines on the horizon and on the racer
Cascaded Shadow Maps
Shadows seem always tricky to get right. If the shadow area is set too large the shadows will appear blocky, if it is too small then there will be objects in view that don’t cast shadows. You can increase the size of the depth map, but we need to be wary not to exceed hardware capabilities. I am not sure what is a safe upper limit that will work for everyone.
Shadows are cast by a DirectionalShadowLight. When using gdx-gltf you have to make sure you import the class from gdx-gltf instead of the standard libGDX class of the same name. This shadow light has an associated orthographic camera to render the scene to a depth map from the light’s point of view. The viewport size of this camera determines how wide the shadow area is. However, the larger the viewport, the coarser the shadow granularity will be.
In the game you can visualize the shadow light frustum at the starting position via the tweaker menu (the post processing shader needs to be switched off for this). It is shown as a white wireframe block with a sphere representing the light source at the centre of the top face. A debug visualization like this can be helpful to understand why shadows appear as they do. For example, if the far plane of the shadow camera is too close, the shadow light box might not even reach the ground.
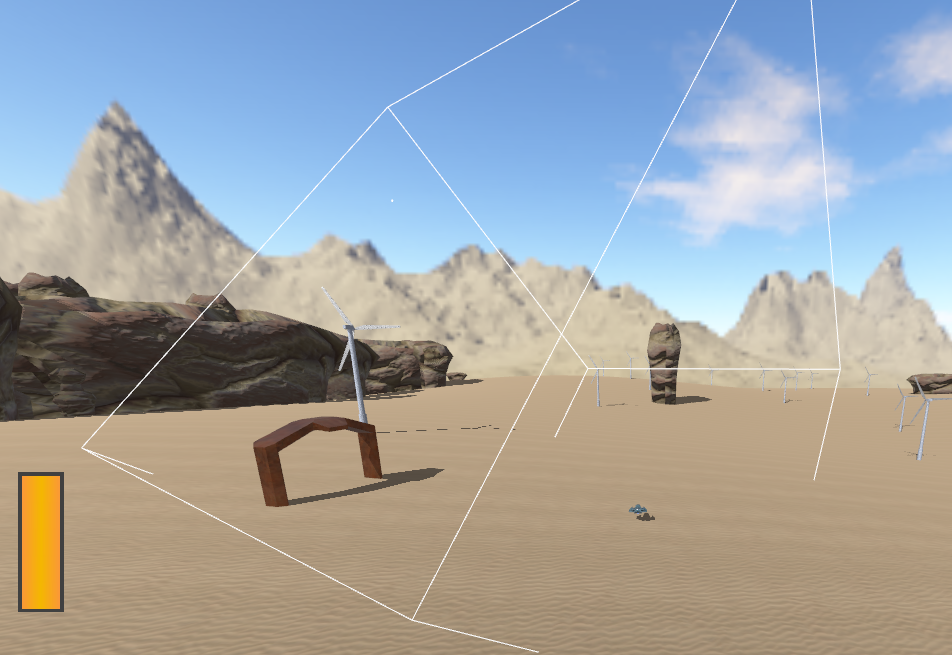
- Figure 3: debug view of shadow light frustum over start position
Since the camera will be moving around a lot, I reposition the directional shadow light every frame to be centred on the player position.
light.setCenter(world.playerPosition); // keep shadow light on player so that we have shadows
One new feature in gdx-gtlf that helps avoid blocky shadows versus missing shadows is cascaded shadow maps. Instead of one shadow map, you have multiple. The shadow map that is used depends on the depth of the fragment. So, you can have coarse shadows in the distance where we can’t tell anyway and fine detailed shadows near the viewer.
It only takes a few lines to set up. Tuning parameters are the number of cascades, the minimum depth and the split factor. I used three cascades (the default map plus 2 extra). For the depth I specified zero which means the frustum depth is used and I use a split factor of 20, which is perhaps a bit extreme, to give lots of detail up close. These are not necessarily the optimum settings and could maybe do with a bit more tuning. For example, during the zoom-in at the start of a race, you can clearly notice a visual transition between cascades for the racer’s shadow. It is no longer needed to reposition the light position as the setCascades method sets the cascade shadow boxes to cover the scene camera’s frustum.
During setup:
        if(Settings.cascadedShadows) {
            csm = new CascadeShadowMap(2);
            sceneManager.setCascadeShadowMap(csm);
        }
In the render method:
        if(Settings.cascadedShadows) {
            csm.setCascades(sceneManager.camera, light, 0, 20f);
        }
For some reason the shadows in the web version are much darker than in the desktop version. Normally, you expect the ambient light level to reduce the darkness where the shadow light cannot reach. (This was due to a bug in gdx-teaVM which is in the process of being fixed, see LibGDX Discord gdx-teaVM thread on 15/05)
Collision
Perhaps surprisingly, this game does not use a physics engine. The racer movement is controlled by the PlayerController class as mentioned before. What remains is collision detection. Mostly of the racer versus the rocks. There are 5 rock models which are randomly distributed on the map. The rock models are randomly scaled and randomly rotated around the up axis.
The collision detection is helped somewhat by the fact that the racer always has a fixed height of 5 units above a gently sloping terrain and all the obstacles are static objects.
So, the collision problem can be approximated quite well as a 2D collision problem.
In the first instance, I implemented a 2d collision detection system where each rock was approximated by a circle. The rocks that are shaped as a gate were represented as two circles, one for each pillar. The oblong rocks were represented as a line of three circles. The circles are scaled according to the rock’s scale. The racer is represented as a single point at its center. This makes the collision detection quite forgiving as it allows a wing to clip through a rock.
To detect if a point is inside a circle on the same plane is very simple and very fast: just check if the distance to the circle centre is smaller than the circle radius. There are fewer than 500 rocks so this can be checked pretty quickly. In case of collision, i.e. the racer position is inside a circle, it is useful to know the direction of the surface where it hit, i.e. the normal vector of the collision surface. For collision with a circle, this is very simple: the normal vector is always pointing outwards, away from the circle centre. The collision response is then to instantly move the racer some distance away from the collider and adjust its velocity vector by reflecting it over the normal vector (bouncing off the rock). It was found to be very disorientating to change the orientation of the racer, so this remained unchanged.
This method was simple and worked reasonably well after tuning the sizes of the circles for each rock type. However, narrowly evading the rocks is the core gameplay mechanic for this jam game and the circles only make a rough approximation. Colliding with an invisible part of a rock would be very frustrating for the player. And clipping through a rock when it should have been a collision feels like cheating.
So, I developed some code to calculate the intersection of a rock with the horizontal plane at y=5. The result is a polygon which gives a 2d outline of the rock at the height of the racer. For the rocks with a bridge shape, the result is two polygons: one for each leg. The polygon is calculated by testing each triangle of the mesh for edges that cross the horizontal plane, i.e. that have one vertex above and one vertex below the plane. We can then determine the intersection point of the edge and the plane through linear interpolation. We gather all these intersection points, pairing up the intersection points that belong to the same triangle. (if there is one edge of a triangle that intersects the plane, there will also be one other edge that intersects, apart from some edge cases). Then we iterate through these intersection points until we have one or more loops which are our outline polygons.
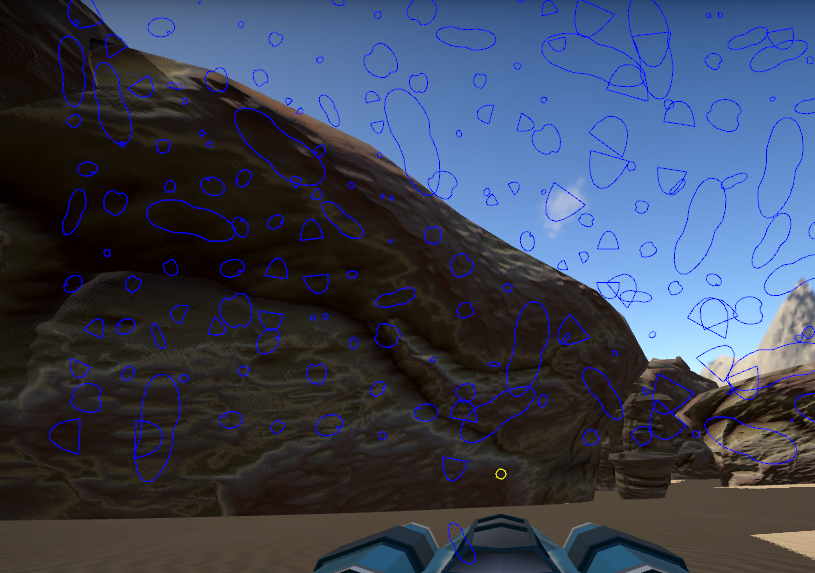
- Figure 4 : polygon colliders
We only have to calculate these polygons once at startup. Then we maintain an Array of polygons for collision detection.
To detect if a point (the racer) is inside a Polygon (a rock), we use the standard method Polygon#contains(Vector2). For an early out, we first use poly.getBoundingRectangle().contains(vec2) to cheaply discard cases where the point is not even inside the polygon’s bounding rectangle.
To reduce the number of collision tests to check, we make use of a spatial hash. We divided the world into a grid and keep an array of collider polygons per grid cell (‘a bucket’). If a rock is large enough to span multiple grid cells, its polygon will be added to the bucket of each of those grid cells. Now to test for collision, we only need to work out in which grid cell the racer is located and test against the polygons from its bucket. So instead of testing hundreds of polygons per frame, we typically test two or three.
Having found an efficient and accurate collision system, I also added the wind turbines and the start and finish gates as colliders, so it is possible to crash into those.
Model cache
Perhaps the obvious solution to rendering many rocks or many wind turbines is to use OpenGL instanced rendering. This is a relatively new feature in OpenGL that allows to render the same mesh very efficiently in many locations and orientations. This is used to render thousands of blades of grass for example. It works by reducing the amount of data sent from the CPU to the GPU per frame. Instead of sending thousands of meshes, it sends only one mesh and then thousands of position vectors (the instance data). See my “Duck Field” demo for an example. This feature does however require GL ES 3.0+ which not everybody may have available.
An older and simpler method of speeding up the rendering of multiple model instances is the libGDX concept of model caches. Normally, each model instance requires a draw call to be rendered. A draw call is the CPU giving an instruction to the CPU and the number of draw calls per frame is an important metric to keep in mind to obtain high frame rates. By grouping model instances into a model cache, many instances can be rendered using a single draw call.
It turned out to be more efficient to render all the rocks every frame via a model cache, than to perform frustum culling to render only the rocks that are in view. This also solved another annoying problem from an early version: shadow popping. This would happen when a rock would be positioned just to the left or right of the camera view and therefore would be frustum culled. But then its shadow (which should be still in view) would also instantly disappear, which is incorrect. Without the model cache this would be hard to fix properly.
The wind turbines masts were likewise also grouped into a model cache. The turbine blades could not be combined into a model cache because they are rotating.
Renderable Sorter
An annoying bug appeared when running on the teavm version. The game would halt with a mysteriously worded exception:
java.lang.IllegalArgumentException: Comparison method violates its general contract!
It turns out this exception is raised by the standard LibGDX method Array.sort when it spots that the comparison function used by the sorter returns inconsistent results. For example, if compare(A,B) returns -1, compare(B,C) returns -1, but compare(A, C) returns 1 which is logically impossible: if A < B and B < C it follows that A < C. This was a head scratcher because I am was not sorting anything in my code.
In the end it boiled down to the sorting of renderables before they are rendered by SceneManager or by ModelBatch. When you call ModelBatch#end() it will sort all the renderables it has accumulated to place the opaque renderables front to back and the blended renderables back to front (and in front of the opaque renderables). The idea of sorting the opaque renderables from close by to far away is that the closer renderables may obscure the further ones, so a simple depth rejection will prevent the further ones to be rendered unnecessarily (we reduce overdraw). This could speed up the rendering.
To do this, the compare method looks at the distance of the two renderables to the camera to work out which is closer.
The dst2() method is used to get the square of the distance from the camera to the renderable. Using dst2() instead of dst() is a classic (perhaps outdated) optimization to avoid a square root operation. Then the square distances are multiplied by 1000 and converted to integers, to allow a precision of 0.001 but avoiding floating point comparison issues. Then these integers are subtracted and the result is truncated to -1, 0 or 1.
From DefaultRenderableSorter.java:
	@Override
	public int compare (final Renderable o1, final Renderable o2) {
		final boolean b1 = o1.material.has(BlendingAttribute.Type)
			&& ((BlendingAttribute)o1.material.get(BlendingAttribute.Type)).blended;
		final boolean b2 = o2.material.has(BlendingAttribute.Type)
			&& ((BlendingAttribute)o2.material.get(BlendingAttribute.Type)).blended;
		if (b1 != b2) return b1 ? 1 : -1;
		// FIXME implement better sorting algorithm
		// final boolean same = o1.shader == o2.shader && o1.mesh == o2.mesh && (o1.lights == null) == (o2.lights == null) &&
		// o1.material.equals(o2.material);
		getTranslation(o1.worldTransform, o1.meshPart.center, tmpV1);
		getTranslation(o2.worldTransform, o2.meshPart.center, tmpV2);
		final float dst = (int)(1000f * camera.position.dst2(tmpV1)) - (int)(1000f * camera.position.dst2(tmpV2));
		final int result = dst < 0 ? -1 : (dst > 0 ? 1 : 0);
		return b1 ? -result : result;
	}
The problem is that if the distance from camera to object is let’s say 1500 units, then the square of that distance is 2,250,000, multiplied by 1000 is 2,250,000,000 while the Java maximum integer value is 2,147,483,647. So, at this point the distance calculate results in an integer overflow and it is easy to understand how this can lead to inconsistent comparisons. I have no idea why this is a fatal error on the teavm platform and not on lwjgl3.
To fix, this we either adjust the world scale to reduce all the distances or we can supply our own renderable sorter which removes this overflow problem.
SceneManager uses its own renderable sorter for the render pass: SceneRenderableSorter which makes more advanced comparisons of the two renderables following the suggestion from the FIXME comment in the default renderable sorter. Comparisons are made in order to cluster together renderables which use the same shader, the same environment, the same material or the same mesh. The idea is by clever sorting, we can reduce the number of switches we need to do between shaders, materials, etcetera. For the depth pass, SceneManager uses the default renderable sorter.
While experimenting with a replacement renderable sorter, I discovered that, surprisingly, the fastest method is not to do any sorting at all. Apparently, the benefit of the GPU avoiding overdraw does not compensate for the cost of the CPU having to perform the sort operation.
Granted, in this jam game there are no blended renderables so the renderable sorting was only supposed to improve performance. In case you have blended renderables in your game, the render order is important for visual fidelity: the renderables need to be blended with what is behind them, which therefore needs to be rendered before.
Debug stuff
A technique which is quite helpful is to have general game settings as static members of a Settings class.
Some of these settings can be manipulated via the settings window in the GUI. This lets you experiment with different values in-game. For example, the light intensity and the amount of ambient light. Or the preferred camera distance.
In a real game, you would remove all these debug options from your release version. But in a jam game between game developers, it may be interesting for people to play with. Debug features that were left in the code:
- Tweaker menu (press T)
- Overlay with active/cached terrain chunks (activate with checkbox from tweaker menu)
- Overlay showing collider polygons (press P)
- Wireframe showing shadow light frustum
- Frame rate indicator (press F).
Conclusions
It was fun making this mini-game in the context of a game jam and I used the opportunity to experiment with some new techniques. Of course, to create something in a very small amount of time it is helpful to have previous projects that you can borrow code from. Even then, the time is very short and some game play elements had to be dropped (e.g. competing racers, fancier camera work). Nevertheless, I think my original objective, to create a real sense of speed, has worked quite well. I hope this write-up can give you some help for your next (jam) game.
Code repo: https://github.com/MonstrousSoftware/Oz-Racer
Play the game here: https://monstrous-software.itch.io/oz-racer
– Monstrous